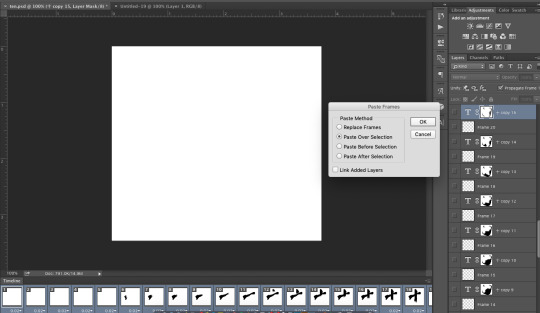
#basically vertical animations are 2 frames long
Explore tagged Tumblr posts
Visit Tumblr Blog
Explore Tumblr blogs with no restrictions, modern design and the best experience.
Last Seen Tumblr Blogs


Fun Fact
Total funding amounts to $125.3M.
Text
Me: oh god this feature is gonna be super wonky to impliment. This code is about to look like shit.
Me 5 minutes later:

#I feel pretty clever for this#basically vertical animations are 2 frames long#and horizontal animation are 3 frames long#and I needed a way to differentiate the two#after this I just need to work out the portion of the animation sheet to draw which wont be hard at all#codeblr#programming#gamedev#indiedev#original post
12 notes
·
View notes
Text
Belly Movement
I've had a few people request for me to add more belly movement during compressions. For a long time, I thought adding this would be impossible, or highly impractical at best. Fortunately, I figured out a way to do this.
The first part of the above video shows belly expansion during compressions, and the second part shows a breathing animation that speeds up along with the heart rate.
The rest of this post will be a long explanation for why something that seems so simple ended up being very complicated. Feel free to skip if you aren't interested in the technical side of game development.
How Animation Works
To explain why adding this movement was difficult, it is important to understand how 3d animation works. 3d models are made up of vertices, basically a list of points that are connected into triangles. To make the models move, these vertices need to move, creating a new model. However, no one wants to create an entirely new 3d model for every frame of an animation. Instead, these vertices are parented to bones, which allow an animator to move a bunch of vertices at once. For example, the vertices of the arm are parented to the arm bone, etc. In reality, vertices can actually be parented to multiple bones with different weights, allowing each bone to influence the vertices' positions. The collection of bones making up a character is called a rig.
The Problem
So why couldn't I just animate the belly movement like any of the other animations in my game? The problem is that I imported these characters from vroid, which means I'm limited to the vroid rig. And the vroid rig does not have a separate bone dedicated to belly movement. Instead, it only has spine bones for controlling the torso. This is why, in the MTM animation, I imitate filling the character's lungs by arching their back.
Theoretically, I could instead import the vroid characters into Blender before importing them into Unity. Using Blender, I could add my own belly bone, solving the problem. But then I would lose the vroid file format, which comes with many benefits. I use a plugin to import these characters into Unity, and this plugin doesn't just set up the model. It also sets up materials, hair physics, jiggle physics, facial expression, eye movement. If I modified the characters in Blender, I would then need to set up all that stuff myself, adding potential hours of work for each character.
After realizing this, I basically gave up on the idea of adding belly movement. The result wasn't worth the development time I could have been spending on something else.
Potential Solution 1
When thinking about this problem, I realized there is another animation technique that is often used for 3d models. Blend shapes! Instead of using bones to move the vertices, an animator can directly move the vertices themselves, then save this new position as a blend shape. Then, the animator can freely interpolate between the vertices' original position, and the the position of the blend shape. This technique is often used for facial expressions, and the vroid models come with predefined blend shapes for the face mesh.
Vroid is mainly used by vtubers, and it is a very common thing for vtubers to transfer custom blend shapes onto existing vroid characters to create their facial expressions. I thought I could do a similar thing to transfer a belly expansion blend shape onto my character's body models.
Unfortunately, you can only transfer blend shapes from one model to another if they have the same number of vertices. This works fine for faces, since vroid splits the face from the rest of the model. However, the body model is combined with the clothes, meaning each character has a different number of body vertices.
After realizing this issue, I gave up on this idea. Until...
Potential Solution 2
The main issue here is that I needed to transfer the belly's movement onto the clothing. Blend shape data is stored as the change in position from the original mesh. Supposedly these deltas can only be transferred between meshes with the same topology. However, I figured I could calculate what the movement of the clothing vertices should be by looking at the closest vertices to the body mesh.
The idea was to loop through all the vertices in the clothes, project the vertices onto the closest triangle of the body mesh, then use bilinear interpolation between deltas of the body blend shape to calculate the delta position of the clothing vertex.
This method should work. However, I couldn't find any information about people doing similar things online. I suspected such a method should be common knowledge if it worked well, which led me to believe that it wouldn't. I think this method would work for clothing that closely matched the body's topology. However, I needed this method to work for shirts, dresses, high-waisted pants, skirts, etc.
This method would be complicated to implement, and I didn't want to put in the effort for something that probably wouldn't work well. I also gave up on this idea.
The Actual Solution
After having a couple failed ideas, I wanted to forget about this issue and work on something else. However, I felt my last idea was so close to being correct. Then I realized something quite simple. It all comes down to the fact that the blend shape I aimed to create was really very basic. I was just going to go into Blender, grab a vertex from the middle of the character's belly, and pull it out using the proportional editing tool. I realized that such a simple edit could be done programmatically in Unity.
Basically, during the game's runtime I can find all the vertices around a target and pull them out using a custom falloff curve. This works exactly how I would have edited the mesh in Blender. And since I am pulling out all the vertices based on distance from the target, it doesn't matter if it pulls the character's body or their clothes. Everything should be deformed equally, resulting in basically no clipping issues.
Ta Da, problem solved! Well, not exactly. Editing the mesh during runtime hits performance pretty hard. My test scene was normally running at 200 fps, but the realtime deformation cut that down to 50 fps. And that was just a test scene. This solution would not be sufficient in the actual game.
That was okay though. I just needed to save this deformation as a blend shape ahead of time. Then there would be no performance impact. This ended up being somewhat complicated in itself. Mainly due to the way Unity handles mesh assets. But I'll skip those problems here, as they aren't as interesting.
Anyway, after all this effort I finally got something working. It may have been a lot of effort for something so simple. But figuring this stuff out is my favorite part of game development. I also plan to use this deformation technique in the future for other things. I think the results look pretty good, but let me know what you think!
#resus#cpr resus#resus community#resus art#resus animation#cardiophile#rescue theater#anime resus#thumper#chest compressions
122 notes
·
View notes
Text

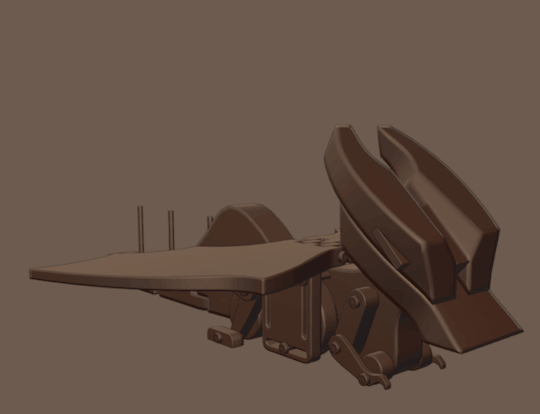
We have wings as of last week! And as of today they seem to work, after I had to reduce the range of the scotch yoke a bit to keep this fairly balanced shape without clipping through the horns. And while I was at it, we let the back legs do less of a high step and got that leggier shape I was wanting for them. I think all the major shapes are final now, just have to punch a few more holes for all the dowels since I decided to make it disassemble-worthy, and reduce the width of that yoke's lower slot now that it's on a smaller wheel.
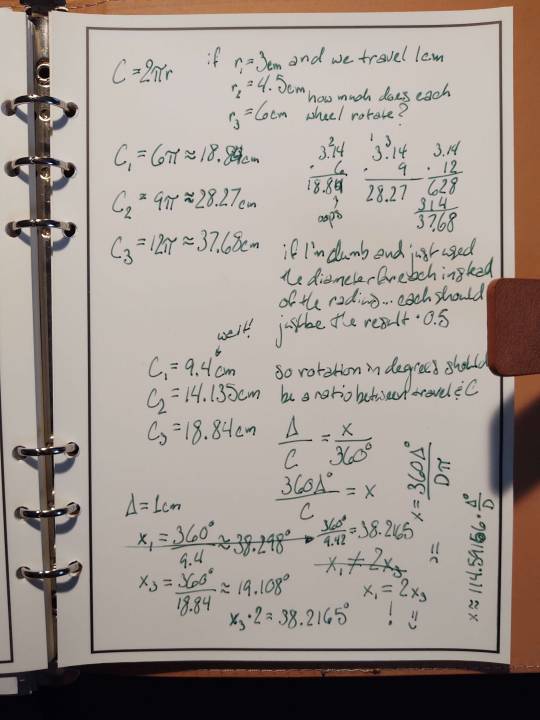
Also, while the every-tenth-frame animation was rendering I did some real paper math (well, reusable paper at least) to check my assumptions that the wheel that's twice as tall will take twice as long to rotate. And almost said it wouldn't! Remember kids, math is dangerous and little mistakes can make you doubt relationships you intuited until you find the issue. Always let your calculator think for you and everything will be okay. (Or, y'know, your basic multiplication skills will erode until you make tons of mistakes like this. Pros and cons.)
Image descriptions got long again so they're under the cut, along with the gif of how our first proportions moved:
[ID: First image is a sequence of 3D renders of a work in progress mechanical dragon toy in orange, showing it gain a hinged tail, large head, and wings before the sizes of its wheels and the slots in a piece on its side adjust and a low frame rate animation begins, showing the way the wheel rotation will move the limbs. The front and back legs are articulated to "walk" with the wheel movement, the front leg on a small wheel causing it to move about 50% faster than the back. There is another set of wheels between the two, twice as large as the front set. This wheel raises the slotted piece with its rotation using a peg in the wheel through a horizontal slot while it's guided up two dowels through vertical slots. The wing rests on the top of this piece is pushed upward, rotating on its hinge in the middle of the back. Everything is mirrored on the far side of the dragon.
Second image is a page of handwritten algebra in green ink on an unlined six-ring notebook page. It starts with the equation for a circumference, C = 2 (pi) r, and asks the question "if (given three radius measurements) and we travel one centimeter, how much does each wheel rotate?" R sub 1 is 3cm, R sub 2 is 4.5cm, and R sub 3 is 6cm -- so R sub 3 is double R sub 1. Hand-multiplication follows, with the answer for C sub 1 now having a note with "oops" and the digit 4 written over the mistaken second decimal 0. A longer note reads, "if I'm dumb and just used the diameter for each instead of the radius...each should just be the result (times) 0.5." The results cut in half are written down. C sub 1 is missing the second decimal place it would have with the corrected numbers from the first multiplication, now with a note "wait!" pointing to it. "So rotation in degrees should be a ratio between travel & C." This note is expressed as an equation, delta over C is equal to X over 360 degrees. 360 delta degrees over C is equal to X. Given delta is equal to 1cm, there follow three solutions for X using each of the circumferences found, then X sub 3 is multiplied by two. Initially that result had a second decimal place of 1 where X sub 1 had 9. To the side is an non-equation X sub 1 is not equal to 2 X sub 3, with a sad face. Written vertically is the formula X is equal to 360 delta degrees over diameter pi; this is simplified to the approximation X is equal to 114.59156 times delta degrees over diameter. Changes in the diameter should be inversely proportional to changes in X. The first solution for X sub 1 is lined through with an arrow to one with the corrected circumference value, which matches 2 X sub 3. The earlier non-equation is crossed out as well; the equation X sub 1 is equal to X sub 3 is followed by an exclamation point and a smiley face.
End ID]
[ID: Animated gif of the dragon toy in a brown matcap, wings and legs moving with the wheels. The wheels are not spinning at a constant rate because their rotation mode hasn't been set to Axis Angle yet, the back "knee" joint raises to higher than the middle back, and the middle of the front arches of the wings travel into the middle of their respective sides' horn by the top of their rotation. End ID]
3 notes
·
View notes
Note
Hi... Do you mind sharing how you got the brush stroke writing on this set? (post/650811744848068609/210511-happy-birthday-zhang-zhehan) It's super pretty and cool! Or if you have a link to a tutorial?
here you go! a step by step for moving brush clipping (idrk what it’s called tbh) as used in this set (ノ◕ヮ◕)ノ*:・゚✧
dunking it all below the cut since it’s pretty long
Part 1: Scene Selection & Preparation
I figured I’d just start afresh instead of showing what I did for my existing gifs
So I chose this latest photo that ZZH uploaded today:

*fans self @ earrings and glasses*
And this scene from episode 1 because I love it when he’s in pain ▓▒░(°◡°)░▒▓
I do my cropping and sharpening on VapourSynth

Part 2: Animated Character
Essentially the same thing as the handwritten effect, except that I’m doing it with Chinese characters
So I was lazy and chose to do it with 十 “ten” (no it’s not a cross even though it looks like one) because it’s one of the the most basic Chinese characters out there with two strokes intersecting
1. Type out the character
2. Create frame animation
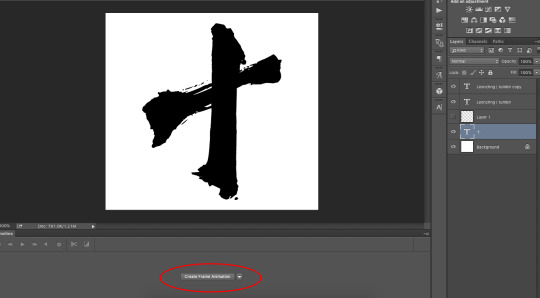
3. Duplicate the frames (because I clearly can’t screenshot I forgot to take a screenshot of the symbol of what it looks like so there is it I’ve drawn it out instead)
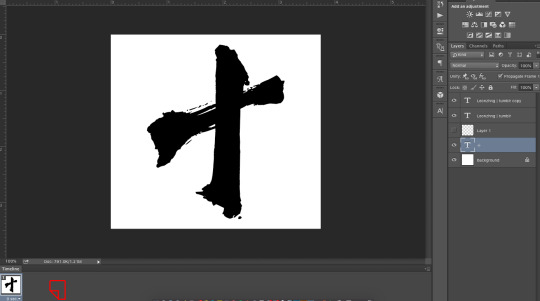
4. I estimated 60 frames for this (I usually go between 70 and 100 frames), since it’s a simple character and also since my gif size is quite big (540x500)
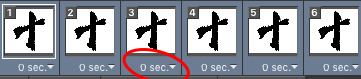
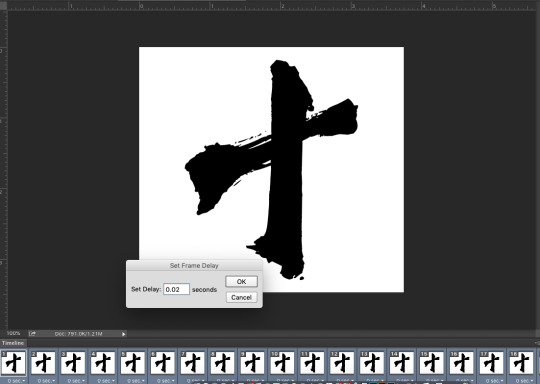
5. Select all frames
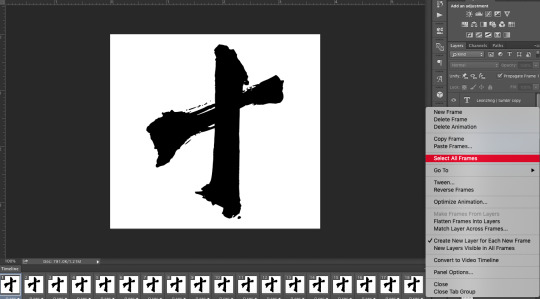
6. Change the delay of each frame to whatever you want it to be. Since I use Quicktime Player to screen record clips, each of my clips usually has a per frame delay of 0.02 seconds so I set my delay here to 0.02 seconds
7. Then go to the layers panel and duplicate the text layer
8. Shift the original layer all the way to above your last frame and turn the visibility off
9. Decide on which frame you want to start your animation on. I decided to start on frame 6 so I shifted the duplicated text layer to above Frame 6 and made sure it was visible

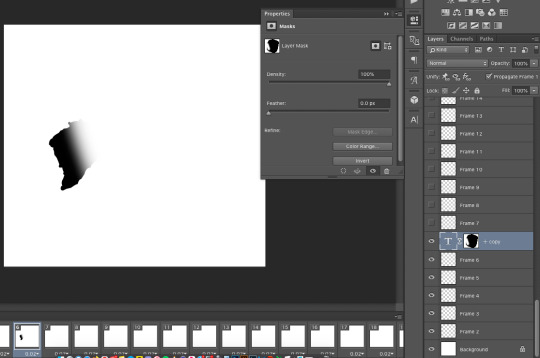
10. Create a layer mask for the text layer
11. Use the lasso tool (L) to select the entire character
12. Making sure the layer mask is selected (and not the actual layer itself), use the paint bucket tool (G) to mask the entire selection and hide the character
13. Change the density of the layer mask so you can still see some of the character

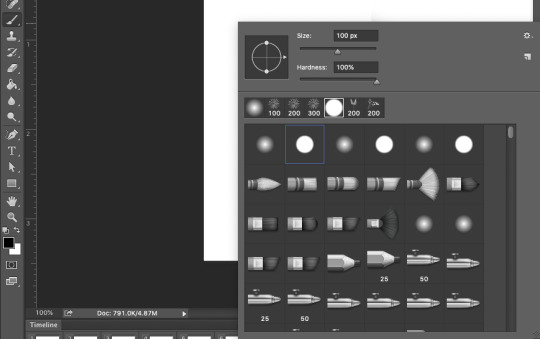
14. Select a soft brush for the eraser (E)

15. And erase over the part you want to see first in the first frame of your animation

16. Turn the density back to 100% to hide the rest of the character you don’t want to show yet
17. Select the next frame (i.e .Frame 7). The text layer is now not visible for this frame
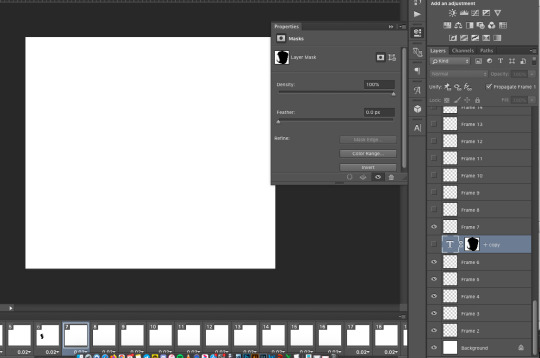
18. Duplicate the text layer, shift it above Frame 7, and make it visible

19. Repeat steps 15-16
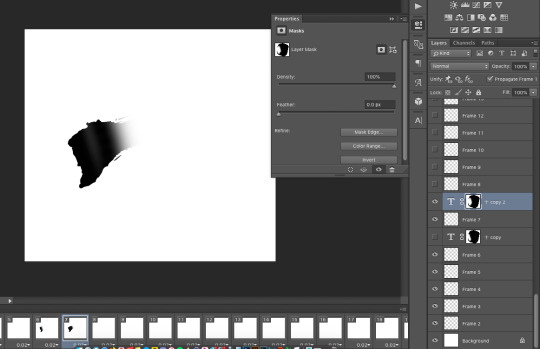
20. If there’s a part of the text where there are intersecting lines, you may accidentally erase over a part you don’t want to show at that particular frame since it may come from a stroke that is only written later - e.g. the portions circled in red that are part of the vertical stroke down

21. Use a hard brush (B)
22. And brush over the parts you don’t want to see

23. When you get to the portions closer to the stroke you want to animate first, convert to a soft brush
24. So that you can refine the edges around there so it doesn’t look that sharp

25. Continue for the rest of the character/ word
26. I happened to finish animating this character in 15 frames since I was doing it really quickly and also because it’s a simple ass character. And now I’m left with 40 empty frames at the back
27. Select all of the remaining frames
28. Go back to the original text layer right on top and make it visible
29. And this is my animated character!

Part 3: Combining with Image & Clip
1. Load the clip you’ve chosen into Photoshop
2. Paste it over all the frames of the animated character - make sure the number of frames and delay are the same!
3. Convert to timeline and convert all frames of the animated character and all frames of the clip into separate smart objects

4. Dunk in the image

5. Clip the image to the animated character smart object. Oh no, it’s gone! Because the animated character hasn’t started yet (it only starts on Frame 6)

6. Shift the timeline indicator down to the end of the timeline so that you can see the animated character and clipped image as it would look like when the full animated character has been written out
7. Change the size and the layout as you wish. I also added a drop shadow so the character would stand out more

8. Colouring
9. Done!
Me after doing this for the 3 characters of his name which have an increasing number of strokes: _:(´ཀ`」 ∠):_
49 notes
·
View notes
Note
ok ur top faves wangxian fics go
hey yati! 🥰️
alright, so first things first, here’s a big wangxian fic rec list i made a while ago, if you wanna check that one out too! consider the list below part 2. these are all my faves so far since my last rec list (as you'll quickly see, i have a LOT of faves).
and just a fyi/psa/disclaimer for anyone reading this: some of these fics have disturbing themes and/or kinky/freaky sex! make sure to check the authors’ tags and notes before reading. also, much like my first rec list, there’s going to be a mix of mdzs and cql canon, characterizations, dynamics, etc., so bear that in mind.
....ok GO
live from new york by varnes | rated E | 87K words | THE snl au fic!!!! yes, by snl i mean saturday night live. this is perhaps the best and funniest story i've ever read, period. varnes is a fucking genius. read this fic.
Wei Ying lets out a long, ugly groan. “I am fine, Lan Zhan. Everybody is overreacting, it’s so embarrassing for all of you.”
“You had undiagnosed pneumonia, which you walked around with for weeks until you passed out during dress,” Lan Wangji corrects him. “It got a big laugh, until everyone thought you were dead.”
He keeps his voice even and does not tell Wei Ying that it had been Lan Wangji who caught him, who called the ambulance, and who rode with him to the hospital, where he was yelled at by nurses who wanted to know why he hadn’t noticed that Wei Ying couldn’t stop shivering or string proper sentences together.
“Rumors of my demise have been vastly overstated,” Wei Ying says. “Anyway, I’m already feeling much better. Basically fine. Really almost completely back to normal, so stop babying me and tell me why the fuck you let your stupid brother hire the worst man in the world to host our show.”
-
OR: the one where they all work at SNL, Yanli's ex-boyfriend is hosting, and that's just the beginning of everybody's problems.
swiss cheese theory by varnes | rated M | 19K words | sequel to snl au fic!!!!!! another must-read.
The Swiss Cheese model of accident causation likens human system defences to a series of slices of randomly-holed Swiss Cheese arranged vertically and parallel to each other with gaps in-between each slice. Defences against failure are modelled as a series of barriers, represented as slices of the cheese. The holes in the cheese slices represent individual weaknesses in individual parts of the system. The system as a whole produces failures when holes in all of the slices momentarily align, permitting "a trajectory of accident opportunity," so that a hazard passes through holes in all of the defences, leading to an accident.
OR: Lan Wangji and Wei Wuxian go to the courthouse.
OR: “Sweethearts,” the city clerk had said, very gently, “you’re already married.”
best friends forever by varnes | rated T | 17K words | alright, so like, strictly speaking, wangxian isn't the focus of this fic, BUT. this fic is so good!! it is seriously so good, and it made me fall in love with jin ling/lan jingyi. also, it's varnes, so read it!
It happened like this: Jin Ling was a sect leader now, which was, and Jingyi really meant this, fucking hilarious. There were few things funnier, in his honest opinion.
Because he was young, and inexperienced, and also — it had to be said — a real shithead, there was apparently some belief amongst his advisors that the best way forward, to promote the picture of a stable, mature sect leader who absolutely did not cry at the drop of a hat, was for Jin Ling to get married.
-
OR: Jin Ling and Jingyi get engaged.
Things spiral from there.
For a Good Time, Call by ScarlettStorm | rated E | 171K words
The picture is of Wei Ying, that much is clear. It’s of a lot more of Wei Ying than Lan Zhan is used to seeing. He supposes that, technically, Wei Ying is dressed. It’s a bare technicality, since one of Wei Ying’s hands has rucked up his black tank top practically to his collarbone, showing a long expanse of abdomen and one nipple. Sweat beads on his sternum, catching the light like jewels. His other hand is--Lan Zhan feels his eyes widen, as though unable to look away from a train wreck--on his hip, one thumb tugging down the waistband of a pair of red briefs. Wei Ying is biting his lower lip and looking directly into the camera, sultry, his eyes dark and inviting. His erection is obvious, outlined against the red of the briefs and framed carefully with the hand on his hip. Lan Zhan’s brain goes wildly, screamingly blank.
Or: Lan Zhan accidentally finds his best friend's OnlyFans account and has an ongoing emotional crisis.
love, in fire and blood by cicer | rated E | 360K words | i actually haven't finished this one since i was reading it when it was a WIP, i need to reread it and catch up fjdskl;fjsd, but i love it very much!!!!!! oh my god he wanted to look nice for his husband..... 🙃 [screams with mouth closed]
"You want Wen Ruohan dead," the Patriarch continued idly. "You want his corpse puppets eliminated. You want his halls burned to the ground and his soldiers disemboweled and begging for mercy. Have I about covered it?"
He gave another knife-edged smile.
"But what will you give me in return?"
"We would be willing to offer quite a bit in return for Wen Ruohan's defeat," Lan Xichen admitted. "But I'm afraid we don't know what an immortal such as yourself desires. Please advise us."
The Patriarch waved at hand at the front of the tent. "I want Second Young Master Lan."
(In which the Sunshot Campaign ends through an arranged marriage to the Yiling Patriarch, and Lan Wangji suffers the mortifying ordeal of falling in love with his own husband.)
how to fall in love with a catfish: a guide by wei wuxian (disaster rat) by bwyn & Yuisaki | rated T | 55K words
A new plan hatches in Wei Wuxian’s head. If this nocturnal, bottom-feeding, slimy, invasive mudcat posing as a beautiful actor thinks he can sway Wei Wuxian with animal pictures and a sob story and an unbelievably stilted way of texting with still no dick pictures in the first five minutes of conversation, he has another thing coming. Wei Wuxian’s got it, alright, he has this in the fucking bag.
~
Wei Wuxian plots to expose a catfish using strategic memes and turtle pictures while wiggling his way out of family dinner. Lan Wangji just wants companions.
there’s no promised goodbye here by Yuisaki | rated T | 54K words
Jiang Cheng stares at him. “Didn’t you say you broke up five months ago?”
“Yeah.”
“So why do you have a picture of you two kissing taped to your fridge?”
“Because we’re too broke for magnets,” Wei Wuxian explains, then considers that statement. “Well, I’m too broke for magnets. Lan Zhan probably refuses to buy them because he’s trying to have lofty ideas about the moral failings of materialism.”
~
Wei Wuxian navigates the trials of living with his ex-boyfriend in apartment 1301.
paint smears on sunny days by SnowshadowAO3 | rated E | 54K words
To say that he runs to his car would be incorrect, as he is a Lan, and running is both undignified and unnecessary unless in immediate danger. Nor does he slam his key into the ignition, or aggressively swerve around the cars on the freeway, or have a mild panic attack at the fact he is picking A-Yuan up late from school for the first time ever.
He comes close, though.
By the time he arrives, it’s 4:35PM, and he has imagined about fifty different worse-case scenarios. The door is partly open when he gets to it, a messy label of 104B—Art Room scrawled with chalk on a placard next to the faded wood. As he opens it fully, he expects to see a wailing, terrified child, or perhaps a scene of utter misery and betrayal.
What he finds is his son, hands covered in paint, being sung to by a beautiful, dark-haired stranger.
“Ducks live in the pond, yellow ducks, happy ducks!”
Lan Wangji stops in his tracks.
(Or: Falling in love with your son’s art teacher, in five parts)
a paper friend by sunzu | rated G | 5K words
Lan Wangji finds a paperman far from its body and helps get it home.
-Or-
Lan Wangji unknowingly meets Wei Wuxian for the first time.
All Caught Up by brooklinegirl | rated E | 37K words
"Betrothed," Wei Ying says indignantly.
Lan Wangji can't stop his gaze from darting up to him. Wei Ying understands. Wei Ying is looking at him, wide-eyed and upset on his behalf.
"And you don't even like her," Wei Ying says.
"I don't even know her," Lan Wangji says quietly.
"But even if you did—" Wei Ying starts.
"I wouldn't want this," Lan Wangji finishes.
Lead Me On Through by mrsronweasley | rated E | 55K words | oh look another canon-era practice kissing fic fjdskfl;ds
"Who do you think your betrothed is?" Wei Wuxian asks, sprawling out in front of Lan Zhan and enjoying the prim thinning of his lips at the question. He shouldn't be sprawling—they're in the library, for one, and Lan Zhan is studying, for another—but he can't help himself. Wei Wuxian is a sprawler.
"I do not believe this to be of importance," Lan Zhan responds, without turning his gaze away from his book.
"What!" Wei Wuxian sits up. "How can you say that? Of course it's important! This is the person you'll be with for the rest of your life, Lan Zhan."
I Started From the Bottom/And Now I'm Rich by x_los | rated E | 58K words | ok so i know that in my spiel above i said to mind the tags, etc., but actually pay no mind to the first two relationship tags for this fic. i PROMISE that this isn't that sort of dead dove fic fjdksl;fjs;lifkj. i. it. it's wangxian. don't sweat it. don't even trip. just—this fic fucking rules. it's completely insane and it slaps. wei ying is a girlboss and a bitch and i like her So Much
“First, you get the money. Then you get the power, respect - hos come last.”
Wen Qing traps Wei Wuxian in the Demon Slaughtering Cave, but Wei Wuxian isn’t interested in being the beneficiary of the Wen Remnants’ noble sacrifice. His efforts to free himself accidentally send him back to the beginning of the Sunshot Campaign. Coreless but armed with demonic cultivation, knowledge of the future and his wits, Wei Wuxian takes advantage of this opportunity to come out on top of both the war and its aftermath—before either has a chance to happen—by marrying and swiftly burying the cultivation world’s worst men.
Lan Wangji is confused, hurt, and uncomfortably aroused by Wei Wuxian’s improbably elaborate series of Sect-themed bridal negligees.
rather cruelly used and rather reserved by x_los | rated M | 14K words
In the month between Lan Wangji and Wei Wuxian leaving Yi City and their attending the cultivation conference in Lanling, Wei Wuxian discovers a locked room in the Jingshi. It is a mystery that clever and curious Wei Wuxian is doing everything in his power to avoid solving.
But the rose was awake all night for your sake/Knowing your promise to me by x_los | rated E | 8K words | resentment tenties~
The resentful energy occupying Wei Wuxian's body like an enemy army is very interested in giving him Lan Wangji, tied up with a bow.
Wei Wuxian is hoping that Lan Wangji (who is far too noble and very keen to save Wei Wuxian's misguided soul) doesn't find out about any aspect of that.
Mo Money, Mo Problems by x_los | rated M | 3K words
After the Mo family perishes in distressing and mysterious circumstances, Wei Wuxian, still reeling from his reincarnation, tries to dip back into their manor for a little travelling money. (Forward planning! What a concept!) Lan Wangji catches him immediately, and is highly unimpressed (read: furious) with Wei Wuxian’s decision to run away from him in the first place.
Standing Engagement by x_los | rated M | 18K words
Lan Wangji believes he and Wei Wuxian are essentially engaged. While they search for his missing betrothed, he accidentally reveals as much to Jiang Wanyin. Now everyone in the cultivation world knows about the imminent marriage, except for Wei Wuxian himself.
Coming Back to Yourself by acernor | rated E | 22K words | genital swapping for fun and nonprofit!
Lan Wangji gets cursed with a ~woman's body~ and has to orgasm to go back. Since he's 1) a virgin 2) super repressed and 3) SUPER gay, he has no idea what to do.
If only he had a super nosy friend who's read lots of erotic novels who could help him figure out what to do... hm...
Save a Sword by etymologyplayground | rated E | 5K words | a fic inspired by the above fic!
Lan WangJi presses a kiss into his throat, which draws a shivering whine from him. "Like this," he agrees, his voice so low. Then he slides one warm elegant hand down Wei WuXian's chest to his belly, and then to his — to his —
--
fan ending for acernor's fabulous masterpiece "coming back to yourself" because i'm a huge goofball and that fic fucks
Our Eyes on the Road by etymologyplayground | rated E | 23K words | brought to you by lore (the author) and Orville Peck's hit song Drive Me, Crazy
Lan Zhan is silent for a long moment, and the van's speakers quietly pipe the second song on the album into the empty space between them. Then Lan Zhan shifts his hand a little on Wei Ying's leg, presses his fingers once into the meat of his thigh. "Alright," he says.
"Alright," Wei Ying echoes in a wheeze.
"Is that better?" Lan Zhan checks, because he is a good boy. Then he spreads his fingers out a little wider, because he is evil and must be stopped.
-
Lan Zhan is driving to Chicago. Wei Ying tags along.
Worship you till morning comes by feyburner | rated E | 7K words
A meet-cute, a first date, a sleepover.
Let's take a ride round the curves of desire by feyburner | rated E | 6K words | yeah........... uhh, yeah.
Wei Ying was sprawled on the floor in front of the oscillating fan when Lan Zhan got home from work.
The Roots Grow Riotous by hansbekhart | rated E | 105K words | a beautifully crafted, emotionally harrowing fic. i should warn you (since it's not quite tagged as such) that while wangxian is endgame, the overall story doesn't have the sort of happily-ever-after ending you might expect. i’ve seen it described as open-ended but hopeful and cathartic, which i find to be a pretty accurate assessment
Sometimes Lan Zhan doesn’t work through lunch. Sometimes he makes conversation with coworkers in the halls. Sometimes he goes home instead of spending the last hour trawling through Grindr. But mostly, that’s exactly what he does. The sameness is comforting. His life spools out in easily measured increments: capsule collections, yards of hand dyed textiles, ninety day lead times, sell through figures, cost of goods sold.
Every date in manufacturing can be calculated backwards and forward from a single horizon point: the date that the goods must arrive into the country where they'll be sold. Other than that, nothing else really matters.
总有一天; a place to hide (can’t find one near) by yiqie | rated E | 76K words | i can't recall a fic ever affecting me as much as this one did. one of the best stories i've ever read. so, so, so crushingly beautiful. it's viscerally distressing/upsetting at times, especially at the start, so please heed the tags and author's note (they provide a way to skip the beginning scene if needed)!
That’s just the thing, isn’t it? Wei Ying feels nothing. He doesn’t feel anything, and this emptiness should scare him. He knows he should be scared. He wants to be scared. He isn’t. Fear itself is never scary; fear is just a response. It means that your body wants you alive. It’s the absence of terror that scares him.
请兔子吃晚饭; treating a bunny to dinner by yiqie | rated T | 3K words | read this one to recover from the above fic
It’s not really about the food. Being able to share it in the same space is its own kind of magic.
爱不释手; never let me go by yiqie | rated E | 69K words | and then read this one to feel harrowed again, this time in canon-verse!
Wei Wuxian has certainly hoped so ardently in his two lifetimes, for so many different things, in so many different ways, that he could have summoned the demon to his front door with his bare hands. His eyes wander to Lan Zhan, settle on the back of his head, the blue-black curtain of his hair. Oh, how he has hoped.
在此恭迎夷陵老祖; to yiling laozu, the great and venerable by yiqie | rated M | 7K words | read this one to recover from the above fic (this time in canon-verse)
“You don’t know? In Yiling, there’s a tree at the edge of town, one that stands at the fringes of where the city ends and the Burial Mounds begin, called the Lover’s Tree. They say if you write a letter and nail it to its branches, Yiling Laozu will receive it, and he’ll reply.”
你的阳光下; wanna hide in your light by yiqie | rated T | 2K words | :')
Lan Zhan shuts off the water before it can start getting cold, because Wei Ying still needs to take one. Any other day, Wei Ying would have slunk in, pretending to be annoyed that Lan Zhan started without him, and neither of them would have want for hot water, but Wei Ying is still asleep.
From my heart's ground. by orange_crushed | rated E | 38K words | get (orange) CRUSHED!!!!!!!
After a while he can feel a palm against his face, gentle fingers soft and soothing. It’s not real, not exactly: he can tell the difference between a ghost’s touch and a living person’s, between a spirit-vision and an overactive imagination. His education has been thorough. But the beating has also been thorough, so for now he forgets what he knows and leans into it, into the hand cupping his cheek. It’s soft and dry as those forgotten petals, as the touch of a pillow. He can smell wildflowers, can taste blood and dirt. My baby, his mother says, and he closes his eyes. My treasure. He barely remembers the sound of her voice, but the feeling of it is just the same. Just the same as ever.
[In which Lan Wangji loses almost everything, plants a garden, and grows a second chance.]
Pentimento. by orange_crushed | rated E | 73K words | this fic briefly gave me a serious case of career envy :/ ......but seriously, this is an absolute must-read!!!
When Wangji was eighteen he’d walked into the first class of his fall semester painting module and there’d been a boy in a hilariously ugly floppy knit hat sitting cross-legged on the floor at the front of the room. He’d had a sheet of canvas paper taped to his board and his board clamped between his legs and a tackle box of brushes and tubes—a real fishing tackle box, with a fish-shaped logo on it that said BASS, not one of the nice art supply storage boxes they sold in the campus bookstore, like the one Wangji was carrying—open beside him. Everyone else had settled into the rows of stools and easels, but that boy had stayed on the floor for the whole two hour and thirty minute studio. Wangji had looked at him and thought, that idiot’s back is going to hurt.
[Former best friends Lan Wangji, paintings conservator, and Wei Wuxian, art handler, meet again and realize... neither of them were actually in unrequited love.]
Many happy returns. by orange_crushed | rated E | 25K words
His fingers are still clasped between Wangji's. In the mirror Wangji watches him tuck his coat between his thighs so that he can fuss with the tucked-in hem of his shirt, tousle up the side of his hair, all one-handed. "I hope what I'm wearing is okay."
"It's good," Wangji says. "You look good."
"I guess I must," Wei Ying says, and then he smiles and bites his teeth into his bottom lip for a second, devastatingly, and before Wangji can drop dead the doors to the elevator slide open, and the hostess station appears.
[In which lonely businessman Lan Wangji meets the right wrong person and changes the course of his life.]
The dreamers. by orange_crushed | rated E | 17K words
“Stop mothering me,” Wei Ying protests. “Why don’t you ever listen?” He scowls at Wangji, but then the lure of the clean water is too much; he sits grumbling and strips off his vambraces and loosens the collar of his robes and wipes himself down in the steam. Wangji sits on a stool and watches him, and after a while Wei Ying slaps the rag into the bowl and glares back. “Are you going to sit and stare the whole time?” he demands. “You want to see me strip naked and give my filthy evil self a good scrubbing, huh?”
Yes, Wangji thinks.
[This is a story about a horrible war and a beautiful dream; about grabbing happiness where you can find it, and not letting go.]
mercy, tear it down. by orange_crushed | rated E | 31K words
“You want me to call you good?” Wangji says. “To make you feel good?” Wei Ying makes a wretched, soft, surprised sound in the back of his throat. “Then will you be good?”
“Uh,” Wei Ying says. His lashes flick down again, nervously. “Good how?”
Wangji hasn’t quite thought that far ahead.
Kingfisher Feathers by Anonymous | rated E | 83K words | WIP (7/10 chapters, last updated 4/13/21) | omg omegaverse!!!! @/ this anon author... keep up the great work! also i have feelings for u
With an almost trance-like detachment, Wei Wuxian touched his own neck, his fingers skimming over the fresh mark. The bite wound had stopped bleeding, although he had no doubts it would open again if agitated.
Bonded.
He was bonded for life.
"Shit," he whispered. He looked over at the sleeping form of Lan Wangji—the Second Prince of Gusu and, until his brother was found, the sole heir to the throne. "Oh, shit. Lan Qiren is going to kill me."
----------
Lan Wangji goes into a fevered rut and accidentally bonds with Wei Wuxian. When they next meet, he remembers none of it, and Wei Wuxian is determined to keep the bond a secret—even when he's sent to the Cloud Recesses to be a consort in Lan Wangji's harem.
(tl;dr concubine!wwx is already married to emperor!lwj, who has no idea. drama ensues.)
Pull out game weak by 74243 | rated E | 23K words | featuring the hottest meanest dom top lesbian lwj of your wildest dreams. i hope ao3 user 74243 is having an amazing day
Wei Ying swipes right.
Extra Time by Anonymous | rated E | 28K words | fic inspired by the above fic! seriously good
How Wei Ying learned to stop worrying and love the strap (an AU of 74243's Pull out game weak)
Superfan by 74243 | rated E | 19K words | ao3 user 74243 writing banger after banger as per usual
“I’m not going to apologize for my job,” Wei Ying said, “so if you want to give me some kind of lecture--”
“No,” Lan Zhan said. “You misunderstood. I am...” she paused, as if considering the best way to put it. “I’m a fan.”
Spit in my mouth, look in my eyes by 74243 | rated E | 7K works | i'm just going to list all of ao3 user 74243's fics, ok? that's what's gonna happen here
Wei Wuxian was a little surprised herself, although she felt bad for being surprised. Of course it didn’t really mean anything about you, how you presented, Wei Wuxian knew that better than anyone, but all the same it was hard to reconcile Lan Zhan as an omega.
(wwx makes an error of judgment)
If the shoe fits by 74243 | rated E | 8K words
Wei Ying loses a bet.
the And they were roommates series by 74243 | rated E | 19K words total
That was the other thing, when Wei Ying had moved in. She’d scented Lan Zhan immediately, the sandalwood and smoke rising off her, almost before she’d taken in Lan Zhan’s straight posture, her narrowed eyes. She’d known that Lan Zhan could tell, too. At the end, when they’d talked about the rent and Lan Zhan’s nearly finished PhD and Wei Ying’s working hours, Wei Ying had said, casual and effortless, “And you don’t mind that I’m an omega.”
“No,” Lan Zhan said.
Chef's kiss by 74243 | rated E | 7K words
Wei Ying said, “You know, in some ways I’m kind of depressed. I took your biggest dick on my first try. Now I don’t have anything to build up to.”
“There are bigger ones available,” Lan Zhan said lazily. “I can pay for express shipping.”
(Lan Zhan works the late shift.)
Gold-palmed Warrior Quest! by 74243 | rated E | 13K words
When Lan Wangji suggested that they camp along the way to the Unclean Realm, rather than staying at inns, Wei Wuxian had been sceptical.
Dway! by 74243 | rated E | 6K words
“Hm,” Wei Ying said. “You like it rough, though, right? You seem like that kind of alpha.” When she saw Lan Zhan’s expression she raised an eyebrow. “What? Was I wrong? Are you tender and sweet? Do you cry?”
“You were not wrong,” Lan Zhan said. “I do not cry. Do you?”
tgif by 74243 | rated E | 17K words
Today Lan Zhan says that if Wei Ying cannot control her mouth then she will have to tape it shut.
On the ground by 74243 | rated E | 5K words
“I think you will like it,” Lan Zhan said.
Does your mother know by 74243 | rated E | 5K words | editing this rec list on a monday morning to add this brand new fic fresh off the presses. thank u ao3 user 74243 for feeding us so well 🙏
“Lan Zhan is such a well-behaved girl,” Madam Yu said.
all that and more by Euphorion | rated E | 20K words
Wei Wuxian locks his phone and puts it down, blinks at his ceiling, and picks it up again. The pictures are still there.
His first thought is that Lan Zhan meant them for someone else. That he just woke up at—he checks the timestamp—6:30 am on a Sunday and decided to go absolute full nuclear seduction option on some poor boy he met on Grindr, who would now be missing out on the best thing to ever happen to him because Wei Wuxian had a bad habit of distracting—of—oh.
Pieces of last night start to resurface and paste themselves together in his head. He winces.
The Golden Cutsleeve by syrus_jones | rated E | 77K words | of my faves, this is one of my favorite... faves. top faves. incredibly fun and silly and hot. just... oh my GOD, wei YING!
“I know! Why don’t you try it? Let me go and I’ll lend it to you!” Wei Wuxian bribed hysterically, desperate to escape from this encounter by any means necessary. And then, his eyes blew wide, realizing what he just said. ‘Wait— just what am I offering Lan Zhan?!’ he thought. How was he so stupid, how did he just offer that without thinking—
“You want me...to use it… after you?” Lan Zhan asked, his voice unusually faint.
~*~
Wei Wuxian's test of mysterious, literally magical sex toy goes awry when Lan Wangji finds him in the woods 'experimenting' with it and it ends up in Lan Wangji's possession.
Unfortunately, neither of them is aware that the toy is anchored to Wei Wuxian's body. Too bad Wei Wuxian invited him to try it.
Boy Trouble, We've Got Double by saltyfeathers | rated E | 60K words | !!!!!!!!!!!!!!!!!!!!!!!!!!!!! this is a really good fic
Lan Zhan stands there in his immaculate, cloud-patterned Lan robes, watching him calmly, one fist tucked up against his back. “I am betrothed.”
Wei Wuxian blinks. “Are you…” He tries to laugh. Again, it sounds inhuman. “Is this about last night? Are you mad at me? I only remember some of it, Lan Zhan. I’m sorry if I made you uncomfortable. I’m sure whatever I did I was just—” He gestures uselessly. He remembers being warm in Lan Zhan’s lap. He remembers fitting snugly in Lan Zhan’s lap. Wrapping his arms around Lan Zhan’s neck. Nosing at his jaw. “…playing around.”
“This has nothing to do with you, Wei Wuxian.”
none in the forest so bright as these by saltyfeathers | rated E | 6K words
Wei Wuxian puts a hand to his head, brain lost in fog. “Lan Zhan,” he pants. “Why are we here? Are we on a hunt?”
As Lan Zhan tries to remember, his brow furrows. He shakes his head slightly. “I don’t know.”
“This is bad,” Wei Wuxian says. When Lan Zhan cups his cheek again, sparks burst behind Wei Wuxian’s eyes. “Or maybe it’s not,” he says unthinkingly. Sighs, almost. Lan Zhan looks at his own arm like it's betrayed him. Wei Wuxian closes his eyes and presses his face into Lan Zhan’s palm. “Lan Zhan, Lan Zhan,” he murmurs. “What’s happening to us?”
out in the garden, there’s things you hid away by saltyfeathers | rated E | 121K words | oww oww oww 😣😣😣💘
There is a man with empty eye sockets and tears of fire in Wei Wuxian’s dreams. Tendrils of smoke curl around him in sleep, pressing at his most vulnerable spots, seeking entrance, slipping between his ribs.
When he ignores Lan Zhan's offers of help, he declines rapidly. He will die. Or, he should. Anyone else would.
Instead, he flees. And transforms.
crawling through your door by saltyfeathers | rated E | 12K words
Lan Wangji kisses him. When he pulls away, he speaks into the silence between them, because when he is with Wei Ying, he so rarely considers. “Why don’t you touch me anymore?”
Lan Zhan Works for the Historical Society by saltyfeathers | rated E | 7K words | some real real good lesbian action up in here
Pretty Lan Zhan. Beautiful Lan Zhan. Ice queen Lan Zhan. So intimidating and femme and coldly polite in public, yet meaner than a man in the bedroom. Wei Ying has slept with men before and none of them were mean-nice to her like Lan Zhan.
threadfic by saltyfeathers | not rated (each chapter rated/tagged individually) | 34K+ words | WIP (11/? chapters, last updated 3/15/21), but it’s a collection of stand-alone oneshots
semi cleaned-up wangxian twitter threadfic.
【已經打動我的心】So Sing To Me All Night by aroceu | rated T | 10K words | arrow writes wei ying so exquisitely well. i was weepy the whole time read this fic. for the best experience, i recommend following along with the accompanying spotify playlist.
No one listens to the radio in this day and age, but somehow from a bunch of left clicking and right clicking, through Facebook and Twitter and Youtube, Wei Ying finds himself on the WQHS homepage—the UPenn student radio station, promising eclectic tastes from a variety of hosts. Wei Ying can't remember giving a shit about his old college's student radio before he dropped out, but it's eleven at night and he has nothing else better to do. He clicks on the button that says Listen Here! and waits to be impressed.
get wild by aroceu | rated E | 24K words | 🔥🏀🔥 BASKETBALL FIC 🔥🏀🔥
He was looking for a specific reaction—to get Lan Zhan to lash out. All hard edges and demanding, the same way during the first scrim, Lan Zhan's dark voice had made him loose and obedient, itching to both rebel and obey at the same time.
It's them, whatever it is, but it doesn't belong on the basketball court.
~
Wei Ying didn't expect to enter a weird... something-with-benefits-plus-power-play with the captain of the Gusu basketball team. He's not sure if it's worth it.
without a warning by aroceu | rated T | 10K words | 🥺️🥺️🥺️
“Blegh,” Wei Ying says. “I hate being sick, Lan Zhan… my throat is so sore… why do I talk so much?”
“Stop talking then,” Lan Zhan says.
“You don’t mean that,” Wei Ying says, in his half-asleep daze. “I know you’ll never admit it, Lan Zhan, but you like it when I talk.”
your honor i’m a freak bitch by aroceu | rated E | 6K words
Wei Ying gestures to his outfit. His hands are buried deep within the hoodie; he’s mostly gesturing with the sleeves. “Well, it works with the whole get up, you see?”
“The…” Lan Zhan looks down at where his fingers are toying with the top of Wei Ying’s thigh highs. Wei Ying pretends he is not shivering. “…skirt. And these stockings.”
“Thigh highs, Lan Zhan!” Wei Ying says, batting at him with the end of a sleeve.
Play It By Ear by aroceu | rated T | 7K words | MY HEART !!!
In the virtual airplane flying over the island, appropriately called Yiling, Lan Zhan watches as bits and pieces of the island load in. There are many Statues of David, a gothic teacup ride, and, from what Lan Zhan can see, an entire field of spoiled turnips.
hanguang-jun @/hanguangjun Do you need turnips to sell?
timmy and tommy in a trenchcoat @/yilinglaozu oh! no haha! 😅 those are from a while ago but my brother insists i keep them there
for the ~aesthetic~
the key that our souls were singing by aroceu | rated M | 5K words
“I haven’t seen you since—Gusu, was it?” Wei Ying says. “Oh my god, it’s been so long. I didn’t even know you were LGBT! Unless you’re here as an ally, which is also totally cool—”
“No, I.” Lan Zhan coughs. Her throat feels dry. “I am a lesbian.”
abort retry fail by aroceu | rated E | 21K words
Lan Wangji must miss his husband over this amnesiac of a man Wei Wuxian has turned into. Well, Wei Wuxian will show him! He'll be even better—or at least, try to be just as good of a husband as he would be, without his memory loss.
Blackout If You Were Mine by aroceu | rated E | 9K words
Wei Ying likes to wear chokers a lot. So Lan Zhan buys some for him. Then, testing their limits, collars.
Wei Ying wears those, too.
-
Or, the one where Wei Ying and Lan Zhan accidentally stumble into a BDSM relationship.
eleven thousand meters & airborne by aroceu | rated E | 5K words | 😎✈️😎
Lan Zhan and Wei Ying join the mile high club.
many fox given by defractum | rated E | 24K words | can't go wrong with foxxian and dragonji content 🦊🐉
Lan Zhan is glaring at him. That's probably fair.
The last time they'd seen each other, Wei Ying had been digging through Lan Zhan's garbage. They'd made eye contact over the shredded bags, the week's trash scattered around him like stinky, oversized Lego.
Lan Zhan's eyes had been wide with horror, and Wei Ying's had been equally wide with feigned innocence. He'd reached out slowly, maintaining the eye contact, and then flipped over the food waste bin full of onion peel and carrot skin as a distraction and slunk off into the night. Probably not his finest moment.
-
Modern AU dragon!LWJ meets fox!WWX.
the tamed by defractum | rated E | 12K words
If the Second Jade of Lan insists on bringing the Yiling Patriarch as his guest to the next Cultivation Conference, he must first demonstrate a control over the Yiling Patriarch and his unnatural abilities.
The letter lies on their desk for days.
-
Post-canon, Wei Ying is invited, sort of, to a Discussion Conference.
us in a king-size, keep it a secret (say i'm your queen, i don't wanna leave this) by matcha_ado | rated E | 3K words
People always said Wei Ying was a royal pain in the ass. They were absolutely right, of course, just not in the way they thought.
it is wednesday my dudes by jelenedra | rated M | 4K words
Wednesday nights at Cloud Recesses strip club are always a little weird, but usually they're not this horny. Whatever Wei Ying and Lan Zhan get up to, Mianmian is not going to be the one to clean it up.
i'm the one for your fire by occultings | rated E | 43K words | cherry magic au! love it
Wei Ying, virgin and noted heterosexual, gets hit with a curse of an unusual nature on his 30th birthday — through physical contact, he can read the minds of others around him.
Enter Lan Zhan, hot former rival and current coworker, whose true thoughts about Wei Ying are nothing like he expects. (A loose Cherry Magic AU)
a thousand teeth, yours among them by darkredloveknot | rated E | 11K words
A one night stand in the time of zombies.
hoe to housewife pipeline by lanzhancore | rated E | 5K words
“You type fast,” Wei Ying murmurs, making a futile attempt at conversation while he waits for him to be done with… whatever. “Not to be pushy, but do you plan on fucking my ass anytime soon?”
or: wei ying has been thirsting after lan zhan for three slutty slutty years
can you feel it by lanzhancore | rated E | an instant classic
“What’s wrong?” Wei Ying asks finally, eyebrows drawn together. “Is everything okay?”
Thumbs stroking circles into his skin as if to comfort him, Lan Zhan says, “Don’t panic.”
“Lan Zhan,” Wei Ying says, sitting up on his elbows. “What did you do to my ass?”
“Nothing,” Lan Zhan says, convincing nobody. “But we need to go to the hospital.”
or: wei ying really should have sprung for the model with the flared base. he learns this lesson the hard way.
because you're mine (i walk the line) by lanzhancore | rated E | 8K words
Wei Ying is freshly cream-pied and still trying to remember where his legs are when Lan Zhan outlaws masturbation.
or: wei ying fucks around and finds out
payload by lanzhancore | rated M | 3K words | babysitter wwx + dilfji, what more could you need
Wei Ying has a whole five hours and thirty-six minutes to calm down but when he hears Lan Zhan’s key turning in the front door lock later that evening he has to cling to the couch cushions to keep from marching into the laundry room to retrieve the briefs so he can wave them in Lan Zhan’s face and demand to know who owns them.
or: lan zhan's self-restraint is not limitless
the to the brim series by verseau | rated E | 14K words total
Wei Ying wants to rob him, but it wouldn’t even be satisfying, since this guy is just—giving away money. With his nice fingers. Maybe Wei Ying will just bite his fingers, and that will give the same endorphin rush as robbing him. / a day told across five parts.
get that message home by verseau | rated G | 2K words | ohhhhhhhhh myyyyy godddddd 😭
Sizhui's father cannot haggle. It is a shame on Sizhui’s honor to have such an honest father.
Author's note [i'm including it here because it's golden]:
there is a scene in arrested development where lucille, who is on the opposite spectrum of humanity as lan zhan, asks, "it's a banana, michael. how much could one cost? ten dollars?" there are no bananas in this story.
dreaming and getting a glimmer by verseau | rated E | 27K words | a particular favorite of mine 🔥🍆💦🕳🔥
Wei Ying discovers himself.
trust your fingertips by plonk | not rated (but really rated E) | 15K word | 🥵️🥵️🥵️🥵️🥵️ plonk you’ve done it again!
Lan Wangji must suppress a shiver at every brush and press of Wei Wuxian’s fingers.
Under different circumstances - less public ones - he would welcome touch, given that his body is in such an aroused state.
Alas, his circumstances are these: sitting quietly while Wei Wuxian, the famous (infamous) Doctor of Yunmeng, digs his fingertips into Lan Wangji’s shoulders and chest and sides and hums thoughtfully.
Doctor, Doctor by YunmengLotus | rated E | 4K words | mmmmhmm!
Wei Ying needs to get a prostate exam. How ever will he deal when the world's hottest doctor walks through the exam room door and tells him to bend over?
TAKOYAKI by ariskamalt | rated E | 3K words | lan zhan gets jealous of his own damn appendages. meanwhile, wei ying is just having a good time.
Lan Zhan…cannot always feel or tell what his tentacles will do.
His free hand curls into a fist. Underneath his skin, the tentacles give a little squirm, as if aware of the challenge he has just issued them. No touching Wei Ying unless he says so, because he wants to touch Wei Ying first. They squirm again, as if to say, Tentacles: 1, Lan Zhan: 0.
That will just have to be remedied.
Or, as phnelt first described: Tentacle-ji with the semi autonomous tentacles getting jealous of his tenties for touching Wei Ying in places he hasn't yet
Outage by SugarMilkTea | rated E | 3K words | [cough] 😳😳😳
The power goes out in Lan Zhan and Wei Ying's rural home in the countryside. Lan Zhan takes advantage of the darkness to give in to one of his baser urges, and Wei Ying's first rural power outage experience is about to get a lot more interesting.
big hands (i know you’re the one) by martyrsdaughter | rated E | 8K words | NICE. 🔥🔥🔥
“Not a big talker, hm?” Wei Ying tilts his head to one side. “That’s okay, I’ve been told I’m a good enough conversationalist for three. My tongue is multi-talented and—”
He has just enough time to feel her palm on the back of his neck and think, oh, her hands are so big, before his words are being stolen into her mouth.
darling, am i a chore? by martyrsdaughter | rated E | 7K words
“Are you done playing around?”
Knowing that’s not what either of them actually wants, Wei Wuxian reaches up to tickle under Lan Wangji’s chin. Soft little scritches, coaxing motions—Lan Wangji is weak to all of them.
“You know what I want,” Wei Wuxian purrs, reaching up on his tiptoes to throw his arms over Lan Wangji’s shoulders. “Call me gege, won’t you? Call me and I’ll stop.”
(or: five times Lan Wangji paid special attention to Wei Wuxian’s interest in being his gege.)
put him on his knees, give him something to believe in by dustyloves | rated E | 2K words | if the title is quoting WAP, then you should know by now it’s gonna be some of that good filth
The next time Wei Ying kisses him, Lan Zhan is careful again. Wei Ying seems determined to make it very difficult.
the hard way by dustyloves | rated E | 9K words
"Anyway, you make it sound like something lewd is going on," Wei Ying complains. "It's all totally above board. She's just being a nice person. It's just one kind alpha grad student offering one room of her huge house to one beta undergrad in need, what could be more appropriate than that?"
// Wei Ying makes a mistake and finds out the hard way.
Exhibition by sevenless | rated E | 5K words
“Oh?” Wei Wuxian raises an eyebrow. “The forbidden section, Lan Zhan?”
“Mn.”
“You’re not afraid of being heard?” Wei Wuxian thinks aloud. A smirk creeps onto his face, eyes glinting. “Or could it be that Lan-er-gongzi actually wants to be heard? Seen? Caught?” He skips in front of him, blocking his way. "Disciplined?”
Lan Wangji’s ears, as always, betray him.
a history of the body by northofallmusic | rated E | 14K words
Wei Ying's body hurts sometimes; she lets Lan Zhan help her.
A fic about the complicated nature of having a body, and also the versatility of sex toys.
(our friendship) up against the ropes by daltoneering | rated E | 36K words
The reboot completes, and Wei Ying’s brain smashes this information together into two mind-shattering thoughts. Number one, he knew very well already, and is now further seared by defined muscles and a mouth-watering tattoo into his every waking moment: Lan Zhan is the hottest fucking person on the planet.
Number two: that guy wasn’t visiting Lan Zhan’s neighbour, he was visiting Lan Zhan, which means:
Lan Zhan fucks. Lan Zhan fucks. Lan Zhan fucks.
;
Lan Zhan has been Wei Ying's best friend for years. Literally, years. How did he not already know? How has he missed this most important of facts? And more importantly, how is he ever going to get over it?
watching my heart go round by typefortydeductions | rated E | 38K+ words | WIP (2/4 chapters, last updated 5/2/21) | lan zhan i love you baby 💞
Lan Zhan falls apart. As it turns out, that's not the end.
~
oh man this list is so long sd;jfkdsjfhhh
yati, i hope you find some stuff in this pile here that you’ll enjoy! it's not an exhaustive list, so check out the authors’ other works and bookmarks for more goods, if you feel so inclined 😙💕
39 notes
·
View notes
Text
hello gamers @canidrook was interested in how i made this gifset so here’s a (hopefully not too long) tutorial under the cut :^)
this won’t cover how to make gifs, just the rest of the process, and i guess there’s also a couple of photoshop tips in here too okay let’s gooo
i started with the two gifs of chief, then both gifs went into their separate 540px panels with dark gray backgrounds (resized and put together in one gif for the purposes of this tutorial). i recommend sharpening the gifs at this (or any time after this) point because starting at 540px and scaling down will cause the gif to lose its sharpness. i did not do this myself because i was too lazy to correct my error lol
coloring came next, i used clipping masks to affect the coloring of only the gifs. honestly you probably won’t be using clipping masks a lot when making gifs, but for anyone interested and/or unaware, clipping masks are layers that alter and are visible only on the layer below it
for example, if i were to create adjustment layers without clipping masks, the canvas and layer tab would look like this
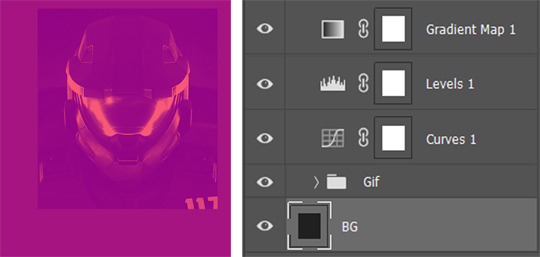
however, by clipping the adjustment layers to the layer directly below it, the coloring affects only the Gif group. you can create a clipping mask from any layer by right clicking the layer in the Layers tab and selecting “Create Clipping Mask”, or by holding down ALT and clicking the bottom border of the layer

here’s the canvas and Layers tab with clipping, where there are now little arrows inside the adjustment layers on the left to indicate that they are clipping masks

of course, there are other ways of achieving this same effect, but i find clipping masks to be faster. and again, not always applicable for making gifs, but i do use it often when painting or editing
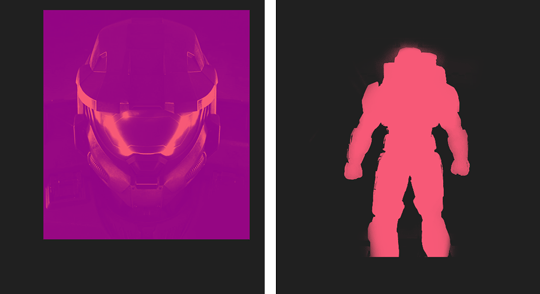
here are the colored gifs
then i moved on to adding text. i used two fonts, Couture which is the bigger, chunkier font and Avenir LT Std (not actually the exact link where i downloaded it from because i can’t remember anymore, but i think it’s close enough) which is the smaller, skinnier font
the default settings of Couture weren’t wide enough for my liking, so i edited the vertical scaling through the Character tab (found in Window -> Character)
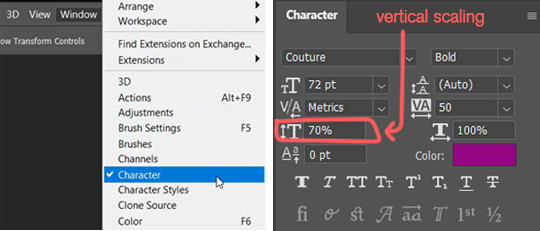
the left is 100% vertical scaling, the right is 70%. i kept this setting for Couture for the whole gifset
a lot of fonts (~*technically*~ they’re called typefaces if you wanna be TECHNICAL) have variations included within its family, e.g. italic, bold, light. some fonts have an outline variation as well, but since Couture does not, i had to do it manually. i won’t go over how i did it though because... it’s kind of a dumb method LMAO
honestly i would just find a font that already has this outline variation included, it’s way easier. the Swiss 721 typeface has this, which might be a default font already installed? also i would have used this Outer Sans font, but i found it after i posted this gifset rip
anyway these are the gifs with all the text included
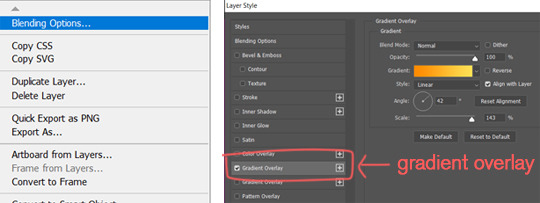
there’s also a purple to pink gradient on top of the tiny text on the bottom of the first gif. to add gradients to text layers, right click on the layer in the Layers tab -> Blending Options -> Gradient Overlay
the last thing i’ll go over is that little animated soundwave (it’s not really a soundwave but Whatever) in the first gif, which is basically just overlayering a gif on top of one another. it’s actually stock footage that i cropped to get rid of the watermark lol shoutout iStock
1. is a screencap of the original video, 2. is the cropped portion that i used

i won’t go over how to overlay gifs, so here’s a tutorial on how to do it. no i did not specifically choose this link because it’s of destiel, but it does use the same method of gif-making as i do, which is the frame animation timeline. it’s just a thousand times funnier that it happened to be a destiel gif
at this point, the soundwave gif should be layered on top of the original gif, and the Layers tab should also be grouped similarly to this (as the above tutorial suggests)
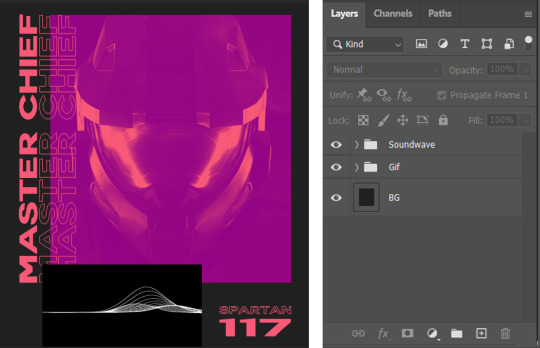
it’s actually important that the Soundwave frames are grouped because it’s how i changed the group’s blending mode to screen, which will make the black background turn transparent. to change the blending mode, click the necessary group, navigate to the menu next to Opacity in the Layers tab, and switch to Screen
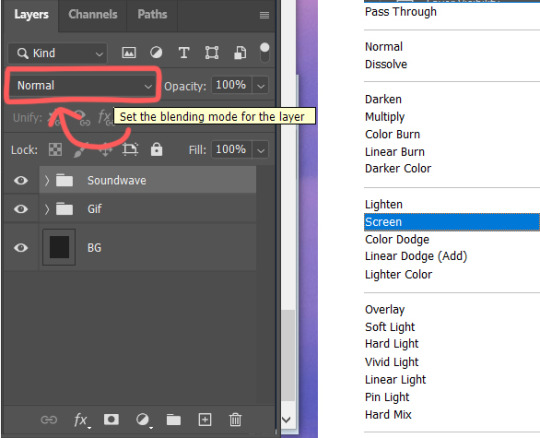
the black should now be transparent, and the gif will look like this

to make the waves purple, i added a gradient map and clipped it to the group, at which point the gif and Layers tab should look like this

there are some other shapes like the plus signs and the colored squares and stuff, but you don’t really need reference pictures for that. one last tip is to use ruler guides to make sure everything is lined up with each other. you can access the ruler with CONTROL + R, then dragging from the ruler out to the canvas, which should create a cyan line that runs infinitely. you can also snap objects to it to make lining up elements like shapes or text that much easier
and that’s it :^) save that bad boy and post it on tumblr dot com !
i apologize if this was confusing, too short, too long, or otherwise incomprehensible, so if anything was unclear/if there are any questions, you can always message me or send an ask! good luck!
#i hope i was concise... i either explain too much or too little lmao#and i hope this helped#btw thank you so much to those who wrote nice things in the tags on this set!!!#it was very sweet of all of you 🥺
8 notes
·
View notes
Text
I HAVE MADE PROGRESS. I am nowhere near the point where I can start implementing my desired changes, but I have started to understand how to piece together images from the information in this ROM. Tagging my continued adventures trying to mod Ghost Trick with #leo-tries-modding-ghost-trick so it can be blocked as desired.
The big breakthrough was realizing I have been operating on a completely false premise. (The other big breakthrough was figuring out how to modify matrix width in CrystalTile2.)
In my last post I mentioned that I was able to view the Ghost Trick logo with the “GBA 4bpp” tile form, so I used that tile form to try and look at the rest of the data on it.
Boy howdy was that a huge mistake. I think that image in particular might have been made for that tile form [possibly as a preview image or something, not going to worry about it], but uh, everything else? Well, it turns out... not so much.
I was taking another look at the content right below that logo because it looked promising but refused to actually turn into anything obvious:

And on a hunch, I decided to just... toggle the tile form to something else. I tried GBA 8bpp. And.... immediately felt like an idiot. Lo:

It’s a bit out of order, but that is CLEARLY text... and what’s more? I scrolled down to the other patterns I was looking at before, which had previously looked like this:
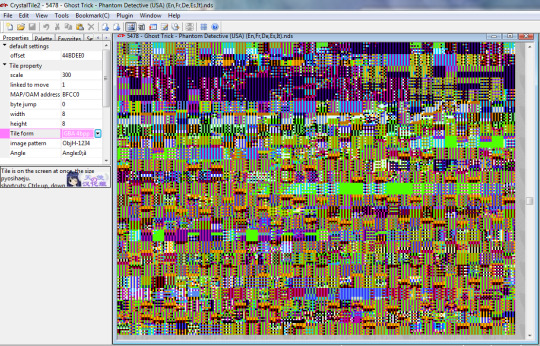
...however, with the GBA 8bpp tile form, suddenly all that visual gibberish became CLEAR BLOCKS AND LINES OF SOLID COLOR:

LOOK AT THIS!!!!
Sure it’s still completely unintelligible, but there are distinct patterns and, more importantly, BIG BLOCKS OF COLOR which is what one would expect for actual sprites and not just garbage data.
I spent a very long time experimenting with matrix sizes (or in other words, how many tiles until it starts drawing the next line of tiles) in order to get the blocks to line up in ways that revealed actual shapes. It became clear that there WERE patterns, and some things I could almost recognize, but I was still completely unable to get any clear images of any particular objects.
I eventually came to accept that the tiles are absolutely not in order and that I was going to have to figure out how to manually put them in the order they should be. That... would be a massive undertaking, but I decided to start with Literally Anything that I could - by some amount of matrix tweaking - get to approximate an image.
I went with this. The first brown pixel is located at 4E2D600, and it must be viewed at a matrix width of 208 tiles to get anything resembling an image (enormous, considering the width of the brown area is 65 tiles...)

(I named the file “animationquestionmark” because I thought maybe it was showing, like, frames of animation somehow.... but, that was not the case.) There were obvious vertical sections, so i started isolating them:

When put all back together I got two images:

At this stage, it became clear that there were HORIZONTAL cross-sections as well. So I set to work splicing them back together line by line:
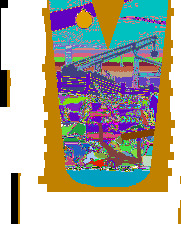
....there it is. AN IMAGE. The palette is wrong, but THAT RIGHT THERE is A COMPLETE IMAGE assembled from accessible data in the ROM.
Going to just... appreciate this some more:
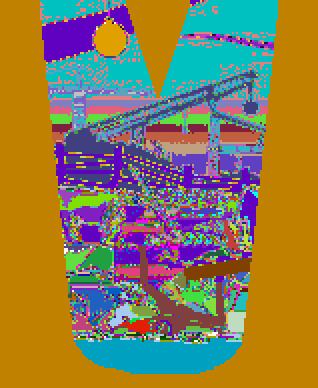
No, it’s not the image I was looking for, but it IS a win. This tells me that even if the tiles are out of order, if I can determine what the original order was, then I’ll be able to re-write them to hard code new/different images in their place.
Here’s a visual breakdown of the transformation (if you can read the tiny numbers):

So the key to transforming the tiles into the correct order, is first determining the matrix width (in this case, 208; basic experimentation implies it won’t be the same across the board, because of course not), and then once you have everything grouped together like this, you select 2 tiles, skip the next 2, select 2 more, skip the next 2, etc etc for the full width of the matrix, then the next line is filled with the tiles you skipped.
I have a lot of questions... first, are there any common matrix widths to make going through all this easier (I sincerely hope so); second, is there a straightforward way within CrystalTile 2 to “automate” this (it’s possible but not holding my breath); third, are all of the assets in the form of “choose two skip two” or does that vary (I sincerely hope not); finally, now that I know there ARE images in here, can I find the particular asset I’m actually looking for?
I don’t know. Now that I’ve done this much, though, I think it’ll make it easier to find other things since I know what sort of weird algorithm is required to put the images back together. I know I’m not looking for a complete image, but a group of pixels that resemble something if organized a certain way.
This isn’t going to be easy, but it is starting to look possible, and that’s a lot better than where I was just a couple days ago. :)
1 note
·
View note
Text
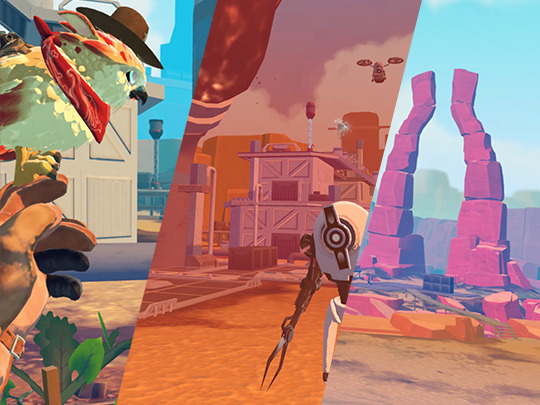
Porting Falcon Age to the Oculus Quest
There have already been several blog posts and articles on how to port an existing VR game to the Quest. So we figured what better way to celebrate Falcon Age coming to the Oculus Quest than to write another one!
So what we did was reduced the draw calls, reduced the poly counts, and removed some visual effects to lower the CPU and GPU usage allowing us to keep a constant 72 hz. Just like everyone else!
Thank you for coming to our Tech talk. See you next year!
...
Okay, you probably want more than that.
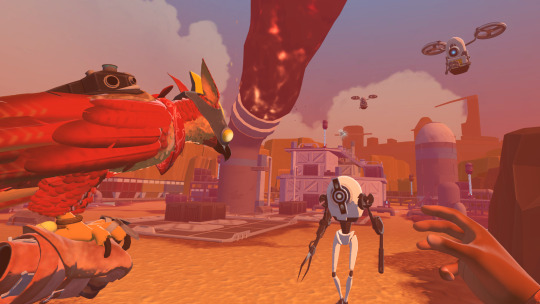
Falcon Age
So let's talk a bit about the original PlayStation VR and PC versions of the game and a couple of the things we thought were important about that experience we wanted to keep beyond the basics of the game play.
Loading Screens Once you’re past the main menu and into the game, Falcon Age has no loading screens. We felt this was important to make the world feel like a real place the player could explore. But this comes at some cost in needing to be mindful of the number of objects active at one time. And in some ways even more importantly the number of objects that are enabled or disabled at one time. In Unity there can be a not insignificant cost to enabling an object. So much so that this was a consideration we had to be mindful of on the PlayStation 4 as loading a new area could cause a massive spike in frame time causing the frame rate to drop. Going to the Quest this would be only more of an issue.
Lighting & Environmental Changes While the game doesn’t have a dynamic time of day, different areas have different environmental setups. We dynamically fade between different types of lighting, skies, fog, and post processing to give areas a unique feel. There are also events and actions the player does in the game that can cause these to happen. This meant all of our lighting and shadows were real time, along with having custom systems for handling transitioning between skies and our custom gradient fog.
Our skies are all hand painted clouds and horizons cube maps on top of Procedural Sky from the asset store that handles the sky color and sun circle with some minor tweaks to allow fading between different cube maps. Having the sun in the sky box be dynamic allowed the direction to change without requiring totally new sky boxes to be painted.
Our gradient fog works by having a color gradient ramp stored in a 1 by 64 pixel texture that is sampled using spherical distance exp2 fog opacity as the UVs. We can fade between different fog types just by blending between different textures and sampling the blended result. This is functionally similar to the fog technique popularized by Campo Santo’s Firewatch, though it is not applied as a post process as it was for that game. Instead all shaders used in the game were hand modified to use this custom fog instead of Unity’s built in fog.
Post processing was mostly handled by Unity’s own Post Processing Stack V2, which includes the ability to fade between volumes which the custom systems extended. While we knew not all of this would be able to translate to the Quest, we needed to retain as much of this as possible.
The Bird At its core, Falcon Age is about your interactions with your bird. Petting, feeding, playing, hunting, exploring, and cooperating with her. One of the subtle but important aspects of how she “felt” to the player was her feathers, and the ability for the player to pet her and have her and her feathers react. She also has special animations for perching on the player’s hand or even individual fingers, and head stabilization. If at all possible we wanted to retain as much of this aspect of the game, even if it came at the cost of other parts.

You can read more about the work we did on the bird interactions and AI in a previous dev blog posts here: https://outerloop.tumblr.com/post/177984549261/anatomy-of-a-falcon
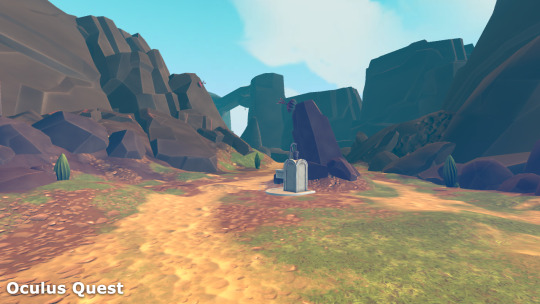
Taking on the Quest
Now, there had to be some compromises, but how bad was it really? The first thing we did was we took the PC version of the game (which natively supports the Oculus Rift) and got that running on the Quest. We left things mostly unchanged, just with the graphics settings set to very low, similar to the base PlayStation 4 PSVR version of the game.

It ran at less than 5 fps. Then it crashed.
Ooph.
But there’s some obvious things we could do to fix a lot of that. Post processing had to go, just about any post processing is just too expensive on the Quest, so it was disabled entirely. We forced all the textures in the game to be at 1/8th resolution, that mostly stopped the game from crashing as we were running out of memory. Next up were real time shadows, they got disabled entirely. Then we turned off grass, and pulled in some of the LOD distances. These weren’t necessarily changes we would keep, just ones to see what it would take to get the performance better. And after that we were doing much better.

A real, solid … 50 fps.
Yeah, nope.
That is still a big divide between where we were and the 72 fps we needed to be at. It became clear that the game would not run on the Quest without more significant changes and removal of assets. Not to mention the game did not look especially nice at this point. So we made the choice of instead of trying to take the game as it was on the PlayStation VR and PC and try to make it look like a version of that with the quality sliders set to potato, we would need to go for a slightly different look. Something that would feel a little more deliberate while retaining the overall feel.
Something like this.
Optimize, Optimize, Optimize (and when that fails delete)
Vertex & Batch Count
One of the first and really obvious things we needed to do was to bring down the mesh complexity. On the PlayStation 4 we were pushing somewhere between 250,000 ~ 500,000 vertices each frame. The long time rule of thumb for mobile VR has been to be somewhere closer to 100,000 vertices, maybe 200,000 max for the Quest.
This was in some ways actually easier than it sounds for us. We turned off shadows. That cut the vertex count down significantly in many areas, as many of the total scene’s vertex count comes from rendering the shadow maps. But the worse case areas were still a problem.
We also needed to reduce the total number of objects and number of materials being used at one time to help with batching. If you’ve read any other “porting to Quest” posts by other developers this is all going to be familiar.

This means combining textures from multiple object into atlases and modifying the UVs of the meshes to match the new position in the atlas. In our case it meant completely re-texturing all of the rocks with a generic atlas rather than having every rock use a custom texture set.
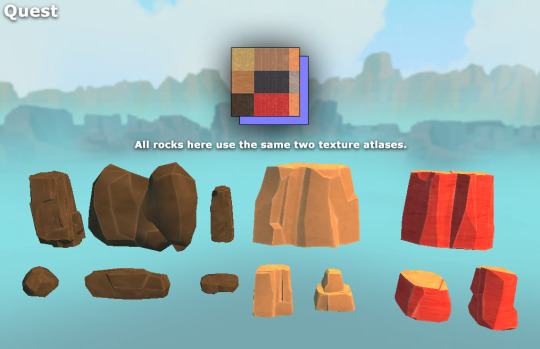
Now you might think we would want also reduce the mesh complexity by a ton. And that’s true to an extent. Counter intuitively some of the environment meshes on the Quest are more complex than the original version. Why? Because as I said we were looking to change the look. To that end some meshes ended up being optimized to far low vertex counts, and others ended up needing a little more mesh detail to make up for the loss in shading detail and unique texturing. But we went from almost every mesh in the game having a unique texture to the majority of environment objects sharing a small handful of atlases. This improved batching significantly, which was a much bigger win than reducing the vertex count for most areas of the game.
That’s not to say vertex count wasn’t an issue still. A few select areas were completely pulled out and rebuilt as new custom merged meshes in cases where other optimizations weren’t enough. Most of the game’s areas are built using kit bashing, reusing sets of common parts to build out areas. Parts like those rocks above, or many bits of technical & mechanical detritus used to build out the refineries in the game. Making bespoke meshes let us remove more hidden geometry, further reduce object counts, and lower vertex counts in those problem areas.

We also saw a significant portion of the vertex count coming from the terrain. We are using Unity’s built in terrain system. And thankfully we didn’t have to start from total scratch here as simply increasing the terrain component's Pixel Error automatically reduces the complexity of the rendered terrain. That dropped the vertex count even more getting us closer to the target budget without significantly changing the appearance of the geometry.

After that many smaller details were removed entirely. I mentioned before we turned off grass entirely. We also removed several smaller meshes from the environment in various places where we didn’t think their absence would be noticed. As well as removed or more aggressively disabled out of view NPCs in some problem areas.
Shader Complexity
Another big cost was most of the game was using either a lightly modified version of Unity’s Standard shader, or the excellent Toony Colors Pro 2 PBR shader. The terrain also used the excellent and highly optimized MicroSplat. But these were just too expensive to use as they were. So I wrote custom simplified shaders for nearly everything.
The environment objects use a simplified diffuse shading only shader. It had support for an albedo, normal, and (rarely used) occlusion texture. Compared to how we were using the built in Standard shader this cut down the number of textures a single material could use by more than half in some cases. This still had support for the customized gradient fog we used throughout the game, as well as a few other unique options. Support for height fog was built into the shader to cover a few spots in the game where we’d previously used post processing style methods to achieve. I also added support for layering with the terrain’s texture to hide a few places where there were transitions from terrain to mesh.

Toony Colors Pro 2 is a great tool, and is deservedly popular. But the PBR shader we were using for characters is more expensive than even the Standard shader! This is because the way it’s implemented is it’s mostly the original Standard Shader with some code on top to modify the output. Toony Colors Pro 2 has a large number of options for modifying and optimizing what settings to use. But in the end I wrote a new shader from scratch that mimicked some of the aspects we liked about it. Like the environment shader it was limited to diffuse shading, but added a Fresnel shine.

The PSVR and PC terrain used MicroSplat with 12 different terrain layers. MicroSplat makes these very fast and much cheaper to render than the built in terrain rendering. But after some testing we found we couldn’t support more than 4 terrain layers at a time without really significant drops in performance. So we had to go through and completely repaint the entire terrain, limiting ourselves to only 4 texture layers.
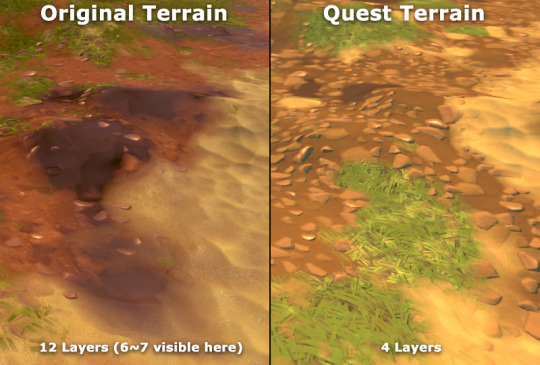
Also, like the other shaders mentioned above, the terrain was limited to diffuse only shading. MicroSplat’s built in shader options made this easy, and apart from the same custom fog support added for the original version, it didn’t require any modifications.
Post Processing, Lighting, and Fog
The PSVR and PC versions of Falcon Age makes use of color grading, ambient occlusion, bloom, and depth of field. The Quest is extremely fill rate limited, meaning full screen passes of anything are extremely expensive, regardless of how simple the shader is. So instead of trying to get this working we opted to disable all post processing. However this resulted in the game being significantly less saturated. And in extreme cases completely different. To make up for this the color of the lighting and the gradient fog was tweaked to make up for this. This is probably the single biggest factor in the overall appearance of the original versions of the game and the Quest version not looking quite the same.
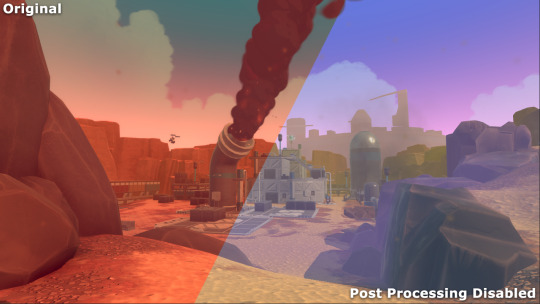
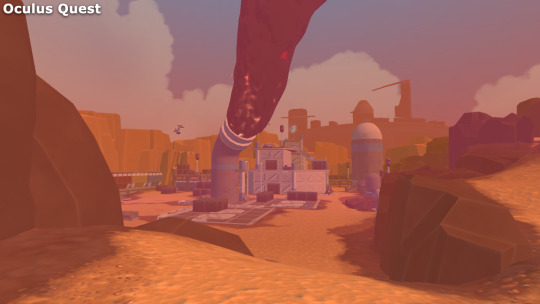
Also as mentioned before we disabled real time shadows. We discussed doing what many other games have done which is move to baked lighting, or at least pre-baked shadows. We decided against this for a number of reasons. Not the least of which was our game is mostly outdoors so shadows weren’t as important as it might have been for many other games. We’ve also found that simple real time lighting can often be faster than baked lighting, and that certainly proved to be true for this game.
However the lack of shadows and screen space ambient occlusion meant that there was a bit of a disconnect between characters in the world and the ground. So we added simple old school blob shadows. These are simple sprites that float just above the terrain or collision geometry, using a raycast from a character’s center of mass, and sometimes from individual feet. There’s a small selection of basic blob shapes and a few unique shapes for certain feet shapes to add a little extra bit of ground connection. These are faded out quickly in the distance to reduce the number of raycasts needed.

Falcon
Apart from the aforementioned changes to the shading, which was also applied to the falcon’s custom shaders, we did almost nothing to the bird. All the original animations, reaction systems, and feather interactions remained. The only thing we did to the bird was simplify a few of the bird equipment and toy models. The bird models themselves remained intact.
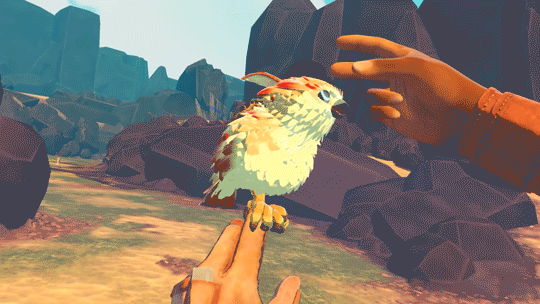
I did say we thought this was important at the start. And we early on basically put a line in the sand and said we were going to keep everything enabled on the bird unless absolutely forced to disable it.
There was one single sacrifice to the optimization gods we couldn’t avoid though. That’s the trails on the bird’s wings. We were making use of Ara Trails, which produce very high quality and configurable trails with a lot more control than Unity’s built in systems. These weren’t really a problem for rendering on the GPU, but CPU usage was enough that it made sense to pull them.
Selection Highlights
This is perhaps an odd thing to call out, but the original game used a multi pass post process based effect to draw the highlight outlines on objects for both interaction feedback and damage indication. These proved to be far too expensive to use on the Quest. So I had to come up with a different approach. Something like your basic inverted shell outline, like so many toon stylized games use, would seem like the perfect approach. However we never built the meshes to work with that kind of technique, and even though we were rebuilding large numbers of the meshes in the game anyway, some objects we wanted to highlight proved difficult for this style of outline.
With some more work it would have been possible to make this an option. But instead I found an easier to implement approach that, on the face, should have been super slow. But it turns out the Quest is very efficient at handling stencil masking. This is a technique that lets you mark certain pixels of the screen so that subsequent meshes being rendered can ask to not be rendered in. So I render the highlighted object 6 times! With 4 of those times slightly offset in screen space in the 4 diagonal directions. The result is a fairly decent looking outline that works on arbitrary objects, and was cheap enough to be left enabled on everything that it had been on before, including objects that might cover the entire screen when being highlighted.
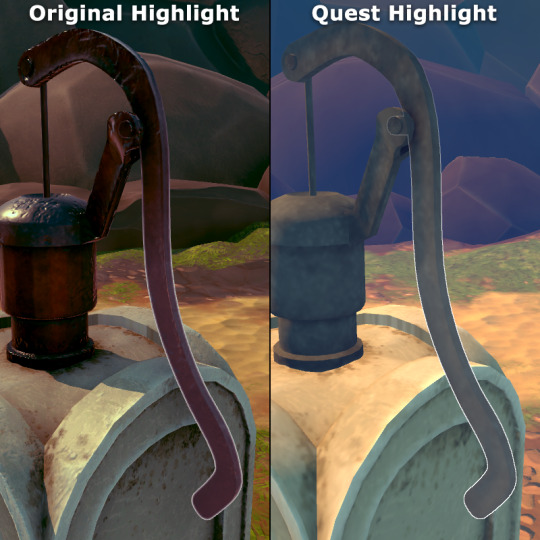
Particles and General VFX
For the PSVR version of the game, we already had two levels of VFX in the game to support the base Playstation 4 and Playstation 4 Pro with different kinds of particle systems. The Quest version started out with these lower end particle systems to begin with, but it wasn’t enough. Across the board the number and size of particles had to be reduced. With some effects removed or replaced entirely. This was both for CPU performance as the sheer number of particles was a problem and GPU performance as the screen area the particles covered became a problem for the Quest’s reduced fill rate limitations.
For example the baton had an effect that included a few very simple circular glows on top of electrical arcs and trailing embers. The glows covered enough of the screen to cause a noticeable drop in framerate even just holding it by your side. Holding it up in front of your face proved too expensive to keep framerate in even the simplest of scenes.
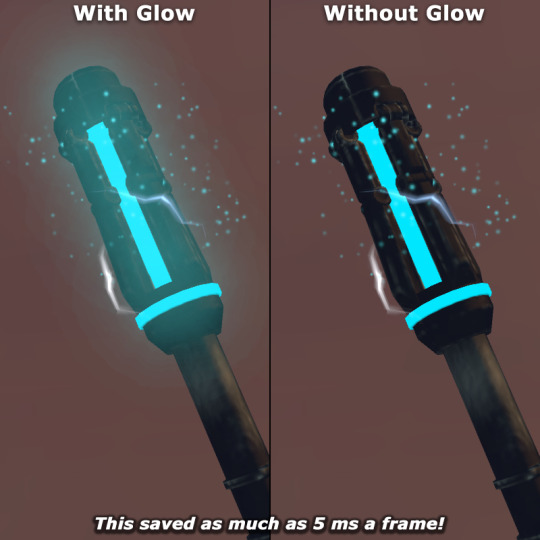
Similar the number of embers had to be reduced to improve the CPU impact. The above comparison image only shows the removal of the glow and already has the reduced particle count applied.
Another more substantive change was the large smoke plumes. You may have already noticed the difference in some of the previous comparisons above. In the original game these used regular sprites. But even reducing the particle count in half the rendering cost was too much. So these were replaced with mesh cylinders using a shader that makes them ripple and fade out. Before changing how they were done the areas where the smoke plumes are were unable to keep the frame rate above 72 fps any time they were in view. Sometimes dipping as low as 48 hz. Afterwards they ceased to be a performance concern.
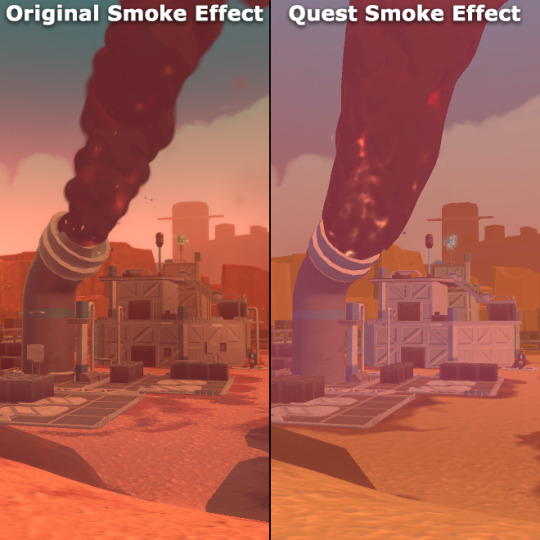
Those smoke plumes originally made use of a stylized smoke / explosion effect. That same style of effect is reused frequently in the game for any kind of smoke puff or explosion. So while they were removed for the smoke stacks, they still appeared frequently. Every time you take out a sentry or drone your entire screen was filled with these smoke effects, and the frame rate would dip below the target. With some experimentation we found that counter to a lot of information out there, using alpha tested (or more specifically alpha to coverage) particles proved to be far more efficient to render than the original alpha blended particles with a very similar overall appearance. So that plus some other optimizations to those shaders and the particle counts of those effects mean multiple full screen explosions did not cause a loss in frame rate.
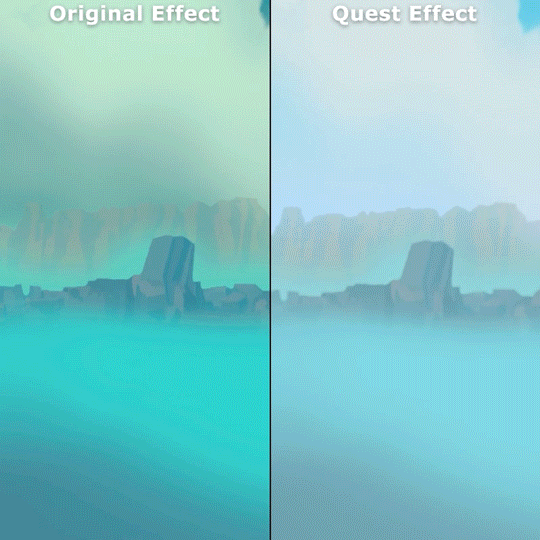
The two effects are virtually identical in appearance, ignoring the difference in lighting and post processing. The main difference here is the Quest explosion smoke is using dithered alpha to coverage transparency. You can see if you look close enough, even with the gif color dithering.
Success!
So after all that we finally got to the goal of a 72hz frame rate! Coming soon to an Oculus Quest near you!
https://www.oculus.com/experiences/quest/2327302830679091/
10 notes
·
View notes
Text
Moving Image Project: Research task/worksheet
Task #1 Research a selection of memorable adverts that have stuck with you since your childhood. • Describe what it is that you think makes these adverts so successful; • Study the way your chosen adverts have been shot and edited and the important role that sound and narration play in the production of these Ads.
https://www.youtube.com/watch?v=S2nBBMbjS8w
What makes this successful is that its not the ordinary advert of a person but with the polar bears it caters to a larger range of audience to the point its memorable for being a fun and easy to watch advert, unlike some adverts today were they are hard to watch and annoying to the fact the point is being forced in your face, this advert isn’t its easy going and memorable for giving the product but having a bit of fun along the way.
This advert is an animation but the way its been done is showing a variety of different viewpoints from wide views to close-up.
The music goes along with the tempo of the animation as well were at the beginning its nonchalant to when the polar bear is flailing around and falling it goes into a higher tempo to the end where it slows down again, showing the urgency that the bears were trying to catch the bottle to where everything was fine again.
https://www.youtube.com/watch?v=TnzFRV1LwIo
This advert is rather memorable because of the gorilla playing the drums was something that no one had expected from an advert for a chocolate bar, the thig that made this advert successful was the fact that it wasn’t the traditional advert and it was unexpected but funny and unique at the time.
This ad has a variety of different shots from extreme close-up to medium to wide shot al intermingling as it switches between a lot of different views editing in a way which flows perfectly together.
The music hit a spot with most people and the fact it was chosen for the drum section was perfect. The actual product doesn’t get shown in the advert proper at the start you have their iconic saying a glass and a half which tells you who the adverts for and the product doesn’t get shown till the end where the screen goes purple and the bar appears.
https://www.youtube.com/watch?v=JW0a70sPnNI
This advert for deluxe paint featured the iconic deluxe dog, this advert was funny and slightly relatable as at the start you see the product but the guy cant find anything to mix the paint and so we follow the dog on a journey to find something the guy can mix the paint with, it is almost like the dog multiplies as he is joined by several different dogs all carrying something different that he can mix with. I think this was mostly successful for the relatability of trying to find a tool to mix the paint also the dogs.
This ad has several different viewpoints medium close-up, Arial view, wide shots, panning, and a couple more.
The music going along with the dogs is very fast pace and shows that the dog is going as fast as possible to find things for the person to use. Also showing the ciaos that the dogs bring in while trying to find the objects, the music fades in as the dog starts running and fades to a stop as the dogs stop, sit and drop all the items that it found and then it starts over again at the end as the dog runs off again.
Task #2
Research a variety of Moving Image techniques: - Camera movements: panning, tilt, zoom, tracking, dolly, pull focus; Composition: a} Focal length, long / standard / wide; b} Viewpoint, high (birds eye), eye level, low (on ya hunkers); c} Action, identify what is moving in the frame (to aid the transition 'cut on a move')
Camera movement:
Panning – Panning is when the camera slowly pans from one section over to another like if you were to take a video of a room or wall to get it all in you would have to pan across itt to have everything in and still be able to see it properly. This usually takes place with the camera body being in a fixed position but moving the way it is facing horizontally.
Tilt – Tilt is when you move the camera vertically usually used when emphasising a point like the height of a building by looking up or the hight of a cliff by looking down. Again the camera body is usually fixed and its just the way the camera is facing that moves.
Zoom – Zoom is almost a transaction between viewpoints like going from a wide angle shot and zooming in to a mid-shot or close-up.
Tracking – Tracking is when the camera moves with the subject like takings a shot of someone moving through a room or shooting someone walking through a crowd. Tracking shot is the name used for when the camera moves through a scene these can be used to follow a moving subject or to simply show of a set/scene.
Dolly – Dolly is when the entire camera is fixed on a steady surface that can be moved around like a tripod on a track or a motorized vehicle, this allows for fluid movement of the camera like filming someone walking into a room from the front, this is similar to tracking, this method is used in sets and tv shows.
Pull focus – Pull focus is where the focus is shifted between two to three people or subjects to shift the viewers focus to these different areas of interest, this is done to refocus the audience to watch out for this object/subject and can often be used when the cinematographer wants the audience’s attention on different aspects within the action.
Composition:
Focal length:
Long – This type of focal length gives the photographer a close crop effect and can be useful for nature and close portraiture (without the need to be right in at your subject’s face).
Standard – This focal length gives the least amount of distortion and can be flattering to the subject at hand.
Wide – This focal length is best for landscape, interiors and when working in confined spaces, this focal lens can have distortion and in times where you don’t want distortion but want the wide angle you may need to edit.
Viewpoint:
High (birds’ eye) –
Birds’ eye = This view is shot directly above and overhead of the subject. This is often used to make the subject seem small and insignificant and can also be used to show a general view of the scene.
Hight view = This view/angle is not as extreme as birds’ eye, but it is high up at an angle to the subject this can be used for overall views of the scene while avoiding being overwhelming. This view is often used when showing the landscape and view of the land. E.g. when an intro is showing the city in a film or tv show this is the angle used.
Eye level – Eye level shot is basically how it sound it’s an angle of view of that and eye would see, these are a neutral view. These shots are more realistic in nature.
Low - Low angle/view supports the opposite effect of high angle/birds’ eye as this angle makes all actions and subjects appear taller or more powerful, this is often used when making someone look more intimidating or used when doing a point of view of a smaller character (like a child), this angle is also good for and overall scene if wanting to build suspense in the scene.
Action:
Identify what is moving in the frame (to aid the transition 'cut on a move') –
Often when switching between a mid-shot and a POV shot the actors eyes will move to where they will be looking or they will blink in which the POV will start blank as if they where just opening their eyes again.
Sometimes to transition between different scene you will get a pan that will fade into the other scene, or even you will follow a character/object/animal into a different scene #9ive seen one where you follow a dog into a different room and then it zooms out into a wide angle and the scene continues.
1 note
·
View note
Text
Technical aspects of a stop motion.
Four most important rules: Keep camera in the same spot, don't change the lighting, make a plan or story board, shoot in manual mode, shutter release cable or button.
Equipment needed: Any camera that can capture digital images, a tripod, lights and something to keep light out, a pc for post production.
Standard resolutions for tv at home:
A tv= 1365x768 for an older non HD tv.
HD= native resolution for a high-definition TV screen is 1920 x 1080. This will have a grid of 1,920 pixels across the screen (horizontal) and 1,080 pixels down the screen (vertical). In total, this means it has 2,073,600 individual pixels (1,920 x 1,080).
Ultra HD = 4K Ultra HD televisions have a native resolution of 3840 x 2160 pixels - which is 4 times the resolution of a Full HD screen. A total of 8,294,400 pixels to be precise
Laptop = Cheap Windows laptops generally have 13.3in to 15.6in with a resolution of 1366 x 768 pixels. This is acceptable for most home uses. Better laptops usually have sharper screens with a resolution of 1920 x 1080 pixels or more.
Desktop = Here are typical resolutions for some popular screen sizes: 19-inch screen (standard ratio): 1280 x 1024 pixels. 20-inch screen (standard ratio): 1600 x 1200 pixels. 22-inch screen (widescreen): 1680 x 1050 pixels.
Top spec Imac= The Apple 27” iMac (2019) is an all-in-one desktop computer that merges a high-end display with the various computer components into a single unified device. Consistently upgraded with improved graphics chips, computing processes, and storage devices, Apple’s iMac line continues to be their top desktop offering for home and office use. Released in 2017, the latest aluminum body 27-inch iMac includes a stunning 27” diagonal Retina 5K display with an overall resolution of 5120 x 2880
Phone we use ( Samsung s10 plus ) = FHD+ (Full High Definition Plus) is 2280 x 1080 pixels. This is the default. WQHD+ (Wide Quad High Definition Plus) is 3040 x 1440 pixels
Aspect ratio for a basic tv = 4x3 for standard tv prior to hd
Aspect for HD= 16x9
Aspect for UHD= 16x9 but for ultra wide its 21x9
Laptop= 16x9
Desktop= 16x9 but this depends on your monitor
Imac= 16x10
Smartphone= 19x9 for the samsung s10 plus
PPI for the following devices:
PRE HD TV= 80
HD TV= 92
UHD= a 65” tv will have 67
Laptop= 104
Desktop pc= 219
Smartphone= 414
The smaller the screen the more PPI it will have.
FPS commonly used for Stop motion/ animation/ video:
Stop motion= When you're shooting stop motion, you might not have time to shoot that many, but you can get away with shooting 12 frames per second or even 7-10 frames per second if you are okay with a little bit of a jerky style
Animation= The average frame rate for animation is 24 to 30 frames per second. 24 generally belonging to cinema and 30 frames for television. 2 minutes for television would be 30 frames x 60 seconds x 2 minutes.
Video= 24fps –This is the standard for movies and TV shows, and it was determined to be the minimum speed needed to capture video while still maintaining realistic motion. Even if a film is shot at a higher frame rate, it’s often produced and displayed at 24fps. Most feature films and TV shows are shot and viewed at 24 fps.
30fps –This has been the standard for television since the early days, and is still widely used despite producers moving toward a more cinematic 24fps. Videos with a lot of motion, such as sports, will often benefit from the extra frames per second.
The reasons for using 30fps is strangely complicated and it mainly has to do with television and electricity standards set a long time ago. If you want to learn more, check out this article on frame rate and jump down to the section titled “modern video standards.”
60+fps – Anything higher than 30fps is mainly used to create slow-motion video or to record video game footage. Additionally, as technology continues to evolve, many smartphones are now capable of recording at 60 fps as well.
Aspect ratios and resolutions and fps for social media:
INSTAGRAM:
aspect = 1.91:1 (landscape) / 1:1 (square) / 4:5 (vertical)
Minimum Resolutions = 600 x 315 (landscape) / 600 x 600 (square) / 600 x 750 (vertical)
Max frame rate = 30 fps
FACEBOOK:
aspect = 9:16 to 16:9 Vertical videos (with aspect ratio taller than 2:3) may be masked to 2:3
Minumum resolutions = 600 x 315 (landscape) / 600 x 600 (square)/ 600 x 750 (vertical)
Max frame rate = 30 fps
YOUTUBE:
Aspect = 16:9
Minimum resolutions = 320 x 240
Max frame rate = Common rates include 24, 25, 30, 48, 50, 60 fps (upload content in same frame rate it was recorded in)
VIMEO:
aspect= Vimeo does its best to accommodate any aspect ratio, but no guarantees
Minimum resolution = 640 x 480
Max frame rate = 60 fps (upload content in same frame rate it was recorded in)
Too many PPI when playing a device: Compression artefacts and lower quality
What does a tv do if it doesn't have enough pixels and what is photoshops equivalent:
Upscaling by downgrading the quality a little and enlarging the image, in photoshop in image size you can upscale and use the resampling to drop in extra pixels and upscale the image.
How many pixels does my camera have (eg. 6000x4000):
Total megapixels:
25.30
Sensor resolution:
6026 x 4017
Sensor size:
35.6 x 23.8 mm
What is the resolution for the recommend stop motion brief: 1920x1080p
What is the aspect ratio of the stop motion brief: 16x9
1 note
·
View note
Text
I put a lot of effort in to this so thought it might be nice for it to live on somewhere more... permanent?? than twitter. It’s a look at the animation issues in Orion and how that underserves the story (which I DO NOT believe is any worse than a typical Inazuma story).
My Tumblr presence isn’t as well known as it is on Twitter, so some baselines:
- I really like Orion
- I don’t think Orion is terrible
- I don’t think Orion is a bad season of Inazuma.
Having said that - Orion’s animation issues, under the cut!
I talk a lot of shit about Orion’s animation, and I know I can come across as dismissive when I respond to every single criticism with “it’s the animation”. So I wanted to write this to explain a little better about what I mean when I say “animation’s shit”, and also delve in to a bit about how I go about thinking about my meta (bcs I use visual queues a lot!). Also I never went to film school and I don’t really know technical words so please excuse when I slip up with that. What I’m trying to get across is the feeling of the scenes more than the exact technical phrasing!!
To start I want to compare these two scenes - Tatsuya and Hiroto from vs Eisei and Hiroto and Fudou from just after vs America.
Quality of the lines aside, there’s some instant visual differences here. We’re introduced to Hiroto in a dark room, and when Tatsuya comes in we see him from over Hiroto’s shoulder. This kind of mid-shot, with Tatsuya entering from the background, invites us to think about the scene from Hiroto’s perspective. It also provides the space for Tatsuya to come *in* to the shot, closer to Hiroto, which he does. It’s showing to us Tatsuya’s attempts at becoming closer emotionally to Hiroto - if you put this scene on mute, you would still get an understanding of their relationship, with Hiroto being unresponsive and mostly stationary and Tatsuya being the physically active participant. We’re also put a little below Hiroto’s natural eye-line, so we’re looking *up* at Tatsuya, which pushes all kinds of subconscious understandings of height, verticality, etc etc. Hiroto is hiding, low. Tatsuya wants to pull him up. The framing helps sell this. It provides setup, path, and progression, as well as making the audience think not just about what Tatsuya is saying, but subtly pushing for us to think about it from Hiroto’s perspective (or at least, with a direct awareness of how Hiroto might react).
Compared to the Fudou and Hiroto, like, this is an interesting angle but I’m struggling to see what they want to tell us with it. The most I can think of is the high angle makes the audience feel almost voyeuristic?? I guess this works bcs we’re kind of looking in to something Fudou wants to keep hidden. But the mise en scene is all over the place. Which is funny bcs there’s not a lot of physical objects in that scene! With Hiroto and Tatsuya, the lockerroom is sparse - it gives the space for the action to play out. I don’t know what it’s doing here. Giving Hiroto a corner to lurk behind? But I want to pull out how static this scene is. The cuts are ordinary, and the frame holds on the same shot and angle for a really long time.
The frame I picked for Hiroto and Tatsuya moves from that, to close-ups as they talk, to showing Tatsuya’s progression across the room, making room for the other Eiseis to come in, and then eventually Hiroto pushing through all of the elements that crossed the emptiness of the lockerroom to get to him (or that have trapped him in what, at the start of this scene, is shown in a wide-shot as a big empty space). The scene ends with Hiroto and Tatsuya in the hallway, and Tatsuya chases after him and asks if he’s running away. The physicality of the scene - the arrangement of characters, and the MOVEMENT of characters - emphasises the dialogue. Tatsuya asks if Hiroto is running, & yeah, he is. He’s avoiding everything the Eiseis say to him. Again, if you watched this scene on mute, you would understand what is going on. Not just from a point-by-point perspective, but an emotional one. Framing, movement, expression, etc, are all used in this whole scene to tell us about the relationship Hiroto has with the rest of the team.
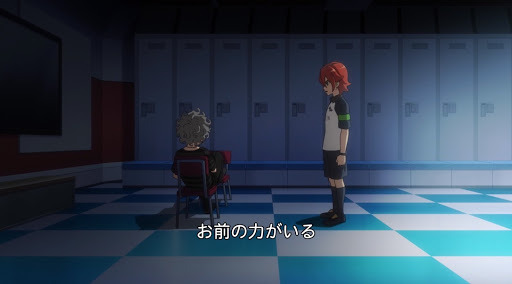
This movement of Tatsuya in to the space happens quickly, in much less time than is spent on Hiroto and Fudou’s initial exchange. Another thing to note is that as this is happening, even when Tatsuya stops, the ‘camera’ still moves, panning across - the movement is carried through which emphasises the ‘closing in’ on Hiroto. In Hiroto’s close-up talking shot that follows, the ‘camera’ pans UP, again reminding us visually of the lower/higher dichotomy between him and Tatsuya, and how that reflects both of their current emotional states.
The Hiroto and Fudou scene has two visual levels. The first one up top, and standard dialogue close-ups. It makes you feel nothing (that’s a lie, it made me feel weird bcs I have no visual storytelling to try and work out what the hell is going on). I actually like this scene, and I think it’s one of the better ones from recent Orion. But I have no idea how to take what Fudou is saying, or even Hiroto for that matter, bcs the dialogue is doing 90% of the work. If you watched this scene on mute you would have no idea of the relationship between these characters, or the severity of what they’re talking about (I’m gonna come back to this). Visually it’s stagnant, and visually it’s not doing its job at conveying the actions and emotions of the characters.

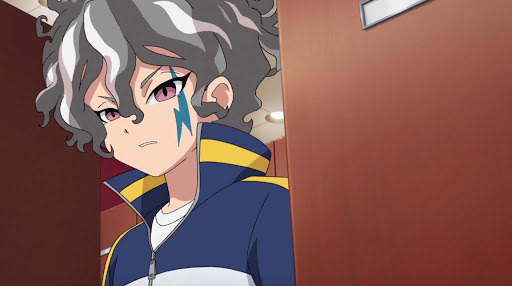
With the first cap and these two… is the entire visual variation in the whole scene. An extreme high POV to a slightly low one. There’s no panning. There’s no movement. You get nothing that really tells you about their relationship, what the stakes are, and the only hint at how they’re thinking is that Hiroto is ticked off. It’s flat, it’s static, and it’s barely visually engaging.
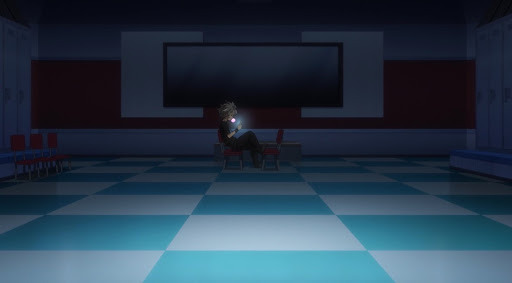
Last thing I want to talk about is lighting. Lighting is HUGE in the Hiroto/Tatsuya scene. He’s in almost complete darkness at the start, and that’s broken by Tatsuya opening the door and demanding to know why he wasn’t at practice. This combination of dialogue/action/LIGHT further feeds in to what we need to know about these characters. Hiroto is overwhelmed physically by the darkness around him. And in barges Tatsuya, with a whole lot of *light*. Tatsuya is visually directly tied to light and with that basic light/dark symbolism that we as an audience can pick up on quickly. I’ve mentioned that I’m not necessarily trying to say I think Inazuma is masterful and subtle - and this scene shows it doesn’t *have* to be. Yeah, the light/dark thing is pretty obvious, but that’s because it works!
There are other uses of light in this scene too which are really cool. Hiroto is alone in this big space, in the dark, but we’re introduced to him with the light of his phone illuminating his face, and reflecting in his eyes. It’s the start of the visual metaphor that he feels alone, small, isolated, and he WANTS to find something else. He won’t say he craves affection, but the visuals tell us that he wants it anyway. It also sets up that he’s looking to light… and then in comes Tatsuya, with light. As the scene progresses and the other Eiseis join in, the very first thing they do? Switch on the light. All of the darkness is gone. And this is when Hiroto tries to escape, because his security and his cover and his excuses that he’s OK with being alone are completely blown away by the gradual introduction of light. CONNECTION is LIGHT. This is a Big reason why again, muted, you would get the emotional beats of this scene.
Fudou and Hiroto has One lighting setting. It has two (maybe three) angles, one of which is a standard dialogue one. Hiroto and Tatsuya in the hallway plays with positioning of the closer-cut dialogue scenes that again pushes Hiroto visually away from the other players, so it’s not like these scenes can’t be interesting either. And they try with the Hiroto/Fudou one, but it’s half-managed at best.
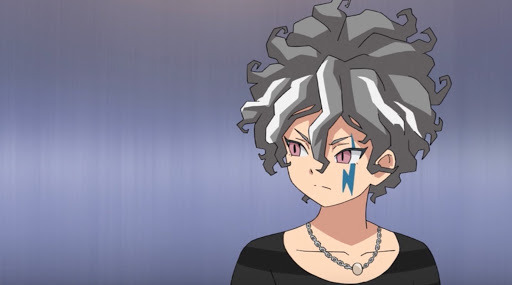
Hiroto has a ‘close up’ dialogue shot, but his position on the far right (with Tatsuya to his left) emphasises his distance. It makes a boring shot contain valuable information.
Orion isn’t that great with its lighting. Most of it is presented in the same average light. But we do get a few good scenes with interesting lighting - some Ichihoshi stuff, and a LOT of the Asuto stuff (on the Skytree, and when he gets kidnapped come to mind). It’s not consistent, which is really a shame, because they’ve used lighting so well in the past to convey mood/emotion. Only keeping it for the really important scenes throws the whole show off balance imo.
---
Now for the severity of what Hiroto and Fudou are talking about. Lucky us, we have several characters-out-for-injury scenes to compare this to, so I’m going to do that. Keep in mind that everything I’ve said about the Hiroto/Fudou scene is basically all I have to say about the visuals in their scene. It’s not a whole lot. Everything else I think about that scene comes from the dialogue alone (but also Hiroto’s cute expressions, I guess I should add that). The end to the scene in the following episode with Fudou’s final words actually add a bit, but they just make the whole thing feel more *weird* to me, and the only visually noteworthy thing is that Fudou’s words are given impact by the straight-to-camera framing. Still no interesting movement or lighting or object placement.
Having said that let’s revisit my own trauma from ep. 2, when Gouenji is injured in vs Korea.
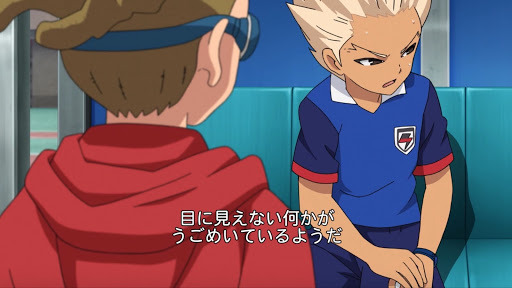
I understand the Hiroto/Tatsuya scene is very long, and the Hiroto/Fudou scene is very short. This bit with Gouenji and Kidou is also pretty short, but it does a LOT. It opens like this, with the two of them trying to work out what could have happened. Gouenji is visibly exhausted and this is emphasised by the angle of shots like this, which is slightly downward pointing! Also what is interesting is that for a lot of this, we don’t get clear shots of Kidou’s face. We have ones like this, where it’s over his shoulder, or ones where he’s speaking close-up in profile. I said above how the straight-to-camera from Fudou was impactful - this is because it’s the character directly calling the audience to the scene. The way Kidou is presented, with us being kept from seeing his whole face, does the opposite. This tells us a bunch about Kidou as a character- that he’s holding his physical self back to avoid vulnerability- and it’s implying a level of emotional distance from him. This is especially true when we’re given a lot of clearly visible Gouenji-is-suffering shots. We’re meant to know 1) Gouenji is in pain, and 2) we’re being visually detached from Kidou’s reaction to it. (also… gouenji… the good boy… he’s doing his best to engage w Kidou on the let’s-solve-this-mystery level when he’s in such pain… you know what this does… it tells us abt gouenji as a character and his values and his perseverance adhahkajshd).
But then this scene shifts. It could have very easily been all done with Kidou standing above Gouenji, with our idea of Kidou as someone who is distant, who is not emotionally drawn to what has happened, who is more concerned about solving how one of his teammates got injured than that teammate themself. But then we get the second half of this scene:
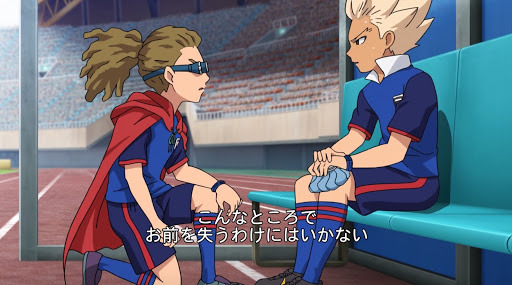
SO MUCH happens with this simple change of shot, positioning, and angle. The previous cap is from right before this, so Gouenji is initially looking away, but Kidou’s moving shocks him in to looking directly at him. This tells us that Kidou has done something that even one of his closest friends was surprised by! Also what Kidou has done is move himself from being *above* Gouenji - visually more distant, emotionally more closed off - and put himself not just on the same level as a character that has been established as physically suffering, but slightly below his eyeline. It moves him in physically closer and more visually level to a character he views as important, and someone who is his equal. The way this frame is presented is straight up telling us not only about the closeness of these characters (by allowing us to see and understand their spatial positioning in relation to each other, and drawing attention to how it’s much closer and more intimate than it was before), but is in direct contrast to Kidou in the earlier part of this very short scene. He’s not keeping himself above, he’s not emotionally disconnected, he’s actually incredibly upset by what has happened and he’s being presented in a surprising way to let us know just how seriously he’s taking all of this.
It’s so so important that Kidou is visually on the same level as Gouenji here, because it adds so much weight to his dialogue. If they had kept him standing, his “I won’t let this be the end for you” would come as an addition to his more emotionally detached investigation in to what could have led to this. This change in pose and increase in visual closeness lets us know that everything he says like this is something that is coming from his heart. Since Kidou in Ares was presented as a pretty distant character, and we have all of this previous information abt how he acts and where he puts himself physically to draw on, we know how to judge the severity of this scene. And look as resident obsessive Gouenji fan, I wasn’t worried about his injury until we got to this point, bcs this is a big shift in how injuries are normally framed, and it set off all the alarm bells. Fudou says in his scene that “this FFI isn’t something so easy [to push through with an injury]”, which is our only indication of how serious his injury is. With Gouenji and Kidou’s dialogue, yes, we get things like “I won’t let this end for you”, which indicates to severity - but so much more of it is sold in the way the scene itself is presented.

This is the other scene where we find out a character is injured to the point where they won’t be able to stay in the main team. And just look at it. Look at their symmetry. Look at their distance. We’re treated to an entire episode of homecomings and reconnections, and this one is instantly distinguished by the distance between the characters. This visual arrangement should be setting off warning bells for the audience, because we know they’re brothers, we know they’re really close! Why are they so far apart?
When Atsuya starts his dialogue, it falls in to place. Shirou is injured, and Atsuya has come to confront him about it. This visual distance between them is interesting, bcs it emphasises how these two actually aren’t all that close when it comes to their personal struggles - especially from Shirou, who keeps a Lot of things from Atsuya (like his injury). It’s setting us up to expect not the easy relationship we had assumed, but one that is far more complex and nuanced. We’re shown them like this, from a distance. We’re shown their dialogue close-ups together on a horizontally cut frame - and while we can see them both at once, we’re made aware of their separation. They’re visually broken by a bordering line, which informs how we read and understand the scene as a whole.
This scene goes on with a lot of little expression changes from Shirou, which is always nice. And as it progresses, it also closes the physical/visual distance between them.
Notice how it’s Atsuya who moved. Shirou is confused, and faced with choices we know later to be very difficult for him, and he isn’t opening up about it - even to his own brother. Atsuya started far away, and in his dialogue accusatory, but he moved closer to his stationary (paralysed?) brother. He’s asserting their relationship. He’s saying “you are important to me”, not with words, but with visual placement. Atsuya is going to be an active force in this relationship. Just these two frames tells us about the current situation (Shirou closing himself off), their relationship (duality), their personalities (Shirou is more reserved/hesitant, Atsuya is more active). We know about the severity of Fubuki’s injury because of how this distance is played with, visually. And it’s so simply set up. It *works*. Again, in a very short scene, we’ve got a lot to work with from a character analysis level and a plot level. The dialogue supports the visuals, and the visuals support the dialogue.
So, back to that Fudou and Hitoto scene. What visuals are there? Fudou and Hiroto’s spatial distance doesn’t change all that much. Their eyeline doesn’t change, the angles they’re presented at don’t change enough to be engaging imo, and we get very little visual representation of the level of their relationship.
With the exception of this initial high angle, it’s not very interesting to look at. It’s static. And it’s almost entirely carried by the dialogue. This is what I mean by the fundamental issues that come up are from the quality of the animation - the layout, the storyboarding, the colour, the direction. The visuals have been used in other scenes to fill in a lot of information, and to underline the dialogue for us, the audience, to better understand the relationship between characters. It’s not just about them being in the same physical space and saying things to each other. It’s about *how* they’re presented in that space, how they’re visually arranged, how the light affects things, etc. Even if all the best characters got in the same place and shared plot details (which they have done in Orion, and it’s been pretty dull) you’re not going to get the feeling of engagement that the well done scenes of Inazuma provide.
Closing out to say I picked the Hiroto/Tatsuya/Eisei scene from Ares bcs it’s one I’d watched recently and remembered well enough to write this without another detailed rewatch. But that kind of scene is a *standard* in Ares, whereas I do think the Kidou/Gouenji and Fubukis scenes are *exceptions* in Orion. There are other good scenes, but it’s nowhere near as consistent and the shockingly done episodes (from an animation standpoint) are just so so terrible. I hope this clears up my approach to Orion complaints!
Stray thoughts:
The Hiroto/Tatsuya/Eisei scene is from their intro episode and very succinctly gives us everything we need to know about their relationship, base personality, and dynamic. Again it’s not just the dialogue that does this: it’s the movement, lighting, and arrangement of the scene itself!
In contrast, the Hiroto/Fudou scene tells us nothing about their relationship even though these are two well established characters who have had previous interaction. Is it a coincidence that they met in Orion and yet we know nothing about their dynamic? There’s only so much animation budget to go around and it just shows how your favourites just being present won’t fix the issues with the visual storytelling.
The Shirou/Atsuya scene is also pretty static and simple in visual structure, but it uses its limited frames to actually get across meaning, unlike the Hiroto/Fudou one.
This budget/lower quality animation issue really affects characters like Fudou and Gouenji, who both express a lot through their expressions rather than their words. Hiroto and characters like the Inakunis can get away with it bcs they’re talkative in general, but for other characters the visual storytelling is really vital to their development and ideas actually getting across on screen.
#inazuma eleven#inazuma eleven ares no tenbin#inazuma eleven ares#inazuma eleven orion no kokuin#inazuma eleven orion
18 notes
·
View notes
Text
overlay gif tutorial ヾ(^ ^ゞ
I don’t really know what to call this style actually (^▽^;) “overlay” is commonly used but it’s a bit of a misnomer because there’s an actual photoshop layer effect called “overlay” and it’s not the one that we’re going to be using. I sometimes refer to it as double exposure because of how it’s taking a bit of inspiration from double exposure photography. I’ll just refer to it as “overlay” for the rest of this tutorial!
disclaimer: this is probably going to end up as a long rambling piece as I walk through how I did this particular gif instead of an actual tutorial lkasdkkls

for @purplexedhuman @wangxianbunnydoodles ! (◕▿◕✿)
Step 1. Choose your scenes
I can’t stress enough how important this step is. I’ve learned through trial and error that for overlaying gifs, the scenes overlap the best when they have large black/ dark patches (this is the case for the particular layer style I use, elaborated below). Notice how in the finished gif, the structure that he’s standing on seems to become “part of” his robes, and how the smoke seems to be “part of” his blindfold? That usually works best with dark patches.
So these were the two scenes I chose:

And I proceeded with cropping and sharpening them on Vapoursynth. Especially if you’re doing this step instead of loading it straight into Photoshop, it’s best if you have an idea of how you want the final gif to turn out so that you can crop the gif directly to the position you want on Vapoursynth.
Step 2. Load gifs into Photoshop + sharpen

This tutorial is a handy one I referred to waaay back when i was still trying to figure out how to merge gifs. In making this final gif, I basically followed all the way up to pasting the second gif over the selection.
I usually work with timelines instead of frame by frame in frame animation [tutorial]. Basically, after converting the frame animation to a timeline, I select all the layers of the first gif and combine them into one smart object, and do the same thing for the second gif, and then use smart sharpen on them respectively.
Impt! Remember to save your file before you convert to smart objects! I don’t know about other Photoshop versions out there, but my particular one has an annoying habit of crashing whenever I convert to smart objects without saving first (; ̄ー ̄川
Step 3. Choose layer effect
I usually go with Lighten - this is the layer effect I was mentioning earlier that works best with dark patches. Other effects that may work are “Screen” and “Darken” (this doesn’t work as well as Lighten/ Screen with dark patches), but I don’t use these often.
Step 4. Use layer mask to hide parts you don’t want
This is what I get after applying Lighten to the second gif. The dark patches look great! The first gif is showing through! But there are those patches marked in the red rectangles where the second gif is covering what I want to be shown on the first gif (‘A`)
This is where you add a layer mask and use a black brush to draw over the parts you want to hide.
If you notice the layer mask thumbnail:
Black = mask
White = show
Then fiddle around with the density and feathering to your desired effect.
Density: affects the opacity of the layer mask
Feather: affects how blurred out the edges of the layer mask are
Step 5. Colour your first (bottom) gif
Have in mind what is the main colour you want to show through for the final gif. For this one, I wanted to go with a magenta colour.
My usual colouring steps are: Brightness/ Contrast > Curves > Lines > Vibrance > Selective Colour > Hue/ Saturation
I use all of them except the last three to change the lighting of the gif, usually trying to make the dark parts even darker so there’s a more obvious overlay between the two gifs.
The last three I use for colour correction of the gif to make it more magenta.
Step 6. Colour your second (top) gif
You can swap around colouring the first and second gifs! You’ll probably end up going back and forth as you try to figure them out.
Essentially the same steps as above, but remember to apply the colouring layers only to the bottom layer (see that little arrow there) or the colouring layers will affect your first gif as well.
Step 7. Mirror effect

This is purely up to you if you want a mirror effect for your final gif!
Select all layers of the gif you want duplicated (the gif smart object and all its colouring layers) and duplicate (command/ ctrl + J)

Then with the layers still selected, go to Edit > Transform > Flip Horizontal (or Vertical if you’re going for a top/ bottom mirror effect)
And then you’ll get this! The second gif is mirrored now but that stark white part on the first gif is covering his face on the mirrored second gif (πーπ)
Repeat Step 4 and use a layer mask to hide that white part of the first gif, again toggling the Density and Feather to what fits best.
BUT! What happens when you end up accidentally masking the same patch on both the top and bottom gif? You’ll end up having a weird transparent patch on your overall gif.
To solve for that, add a black layer right at the bottom so that it will cover up that transparent area.
And then you add your text (if you want to) and that’s it! 〜(꒪꒳꒪)〜 ngl, this takes a bit of practice to get the hang of and my earlier attempts at this were... laughable _(´ཀ`」 ∠)_ but it’s a really fun style to work with because you don’t really know what your final gif will look like since it depends on the particular scene you choose and how you crop it - because these will affect whether you can mirror/ duplicate them and how the two scenes will stack on top of another.
But have fun and holler if you need any help! I’m faaaar from being a Photoshop master but I’ll be happy to help where I can (ノ≧∀≦)ノ
299 notes
·
View notes
Text
How to make (seamless) overlay gifs
What exactly is an overlay gif? Most of the time an overlay gif is referred to as a gif that is added on top of an image or gif or (layed over it, if you will). The term can be slightly confusing as it would have you assume that you’ll be using the Overlay blend mode in Photoshop, which most of the time is not the case. These gifs can also be referred to as animated textures or simply gfx.
First of all, here’s a quick rundown of how to use an overlay gif:
Open your base image (or gif) in Photoshop
Crop and size the image how you like (you can still do that later of course, but I’d recommend doing it now, especially if you’re using a premade overlay gif, as those are often rather small) (you can also add your coloring at this point)
In your timeline, click on “Create Frame Animation”
Duplicate the frame as many times as you want
Open your overlay gif
Select all layers in the layer panel, group them together
Select all frames in the timeline, click the button on the top right of the timeline and click on “Copy Frames”
Go back to your base image, make sure it’s the same amount of frames as your overlay gif
Select all frames and click on “Paste Frames” in the timeline menu
Adjust the position and size of your overlay gif
Change the blend mode of your overlay gif to Screen
Don’t forget to change the frame duration and loop forever
Make sense? If not, skip to step 11 of the following tutorial for a more detailed demonstration.
How to make an overlay gif:
First you need to find a video. There’s a lot of free videos you can use on youtube. You could look up ‘free overlay’ to get some ideas of what kind of videos there are. I’ll use snow today, so I just searched ‘snow overlay’. This is the video I’ll be using for this tutorial.
Some of these videos have a download link in the description, some do not (even though they say they’re free). There’s a bit of an issue with downloading youtube videos in good quality lately, but this site should work.
You can just make a gif from the video as you would with any other gif and then use it as an overlay gif, but personally, I like to make the gifs look as seamless as possible, so I loop them into themselves.
Here’s a comparison:
'regular’ gif:

gif looped into itself:

To do this, you want to open your video in Photoshop (File → Open / Cmd or Ctrl + O)
Since the video is rather short, it appears quite small in the timeline. You can change the view at the very bottom of the timeline (If for some reason your timeline isn’t showing, go to Window → Timeline)

1. Trim the beginning of the video.

You can do this by simply clicking and dragging the beginning of the video. Alternatively you can also move your playhead to the point where you want to cut and the click on the scissor symbol in the timeline. In order to be able to loop the video into itself, we can’t use the very beginning of it, because we’re going to need to bring some of the footage back later (I’ll explain when we get there.)
2. Trim the end of the video.

When you’re dragging, you’ll get a little preview window that shows the Duration of the clip. If it says 00:21 for example, that means the duration is 21 frames. If it says something like 01:11, that would mean 1 second and 11 frames. How long 1 second is for your video depends on its framerate. Normal framerates are 24-25 frames per second (fps for short), but it can also be something like 23,9. You can see the framerate of your current video at the bottom of the timeline. As you can see, the video I’m using has 30 fps, so a duration of 01:11 would mean it has 41 frames (30+11). You should make sure that your video is no longer than maybe 25 frames. You have to keep in mind that the file size limit for tumblr is 3MB and the more frames your gif has, the bigger the file size. It also depends on your image dimensions. If you use a horizontal image that doesn’t have a lot of height, you’ll likely be able to get away with more frames, but with overlay gifs, I personally often use vertical images that have a lot more height than they do width, and in terms of the amount of frames with an image that big, child, let me tell you, the struggle is real. For those images I’d say if you want to play it safe, go with maybe 13 frames. Deleting frames at the beginning and/or end is tricky with this method, since by doing that, you’ll lose the whole seamless/looping into itself aspect of it.
3. Duplicate the video.

Click on the Video Group and hit Cmd or Ctrl + J
4. Move the bottom clip to the end of the top clip.

Simply click and drag it over.
5. Bring back the beginning of the bottom clip.

Click and drag it to the same position as the beginning of the upper clip.
6. Trim the end of the bottom clip.

Click and drag it, so the length of both clips matches. So why did we just do all this? Because now the end of the lower clip is the beginning of the upper clip.
7. Click on the arrow of the upper clip and click on the stopwatch icon where it says “Opacity” to add a keyframe.

Clicking the stopwatch enables keyframe animation. The little yellow diamond you see is a keyframe. When you add a keyframe it will be added at the current position of your playhead, so make sure the playhead is positioned at the beginning of the timeline (although you can move keyframes by clicking and dragging them.) You can animate different parameters using keyframes. Think of it as a snapshot of the current state of the parameter you’re animating. We’re animating the opacity here and the keyframe makes sure that the opacity is at 100% at the beginning of the video.
8. Move the playhead to the end of the clips.

9. Click the diamond to add another keyframe.

10. In the layer panel, lower the opacity of the upper video to 0%.

So now when you play this back, the opacity of the upper clip will gradually decrease to reveal the lower clip and since we made sure that the end point of the lower clip is the starting point of the upper clip, it will give the effect of looping into itself.
Now you can save it out as a gif. The cool thing is, you can save it out with its current dimensions, so you have a lot of playroom when you’re adding it to your image later.
To use your overlay gif, open it in photoshop.
11. Select all layers in the layer panel and group them together with Cmd or Ctrl + G. Double click to rename it.

You don’t technically have to group your layers or give the group a name, but I recommend doing it for the sake of organisation.
12. Select all frames.
On the upper right side of the timeline, click the little icon and choose “Select All Frames”. Or select them manually, if you prefer that.
13. Copy Frames.

From the same menu, select copy frames.
Open the image you want to add the gif to.
14. Create Frame animation.

When you’ve opened your image, your timeline should have a button that says “Create Frame Animation”. If it says something else, click on the arrow next to it and you should be able to find this option.
15. Duplicate Frames.

To duplicate the current frame, click the button next to the trash icon. Repeat this until you have the same amount of frames as your overlay gif.
16. Paste Frames.

To add your gif, on the right of the video timeline, choose “Select All Frames” and then “Paste Frames.”
You should get this window:

Choose “Paste Over Selection” and hit OK.
17. Change the blend mode.

Now that you’ve added your gif it’s covering your image. We don’t want that. Select your gif in the layer panel and from the dropdown menu change the blend mode to “Screen”. The Screen blend mode basically makes all the dark parts of the image invisible and in this case, we’ll be left with the snow:

When I recorded this tutorial I changed the image size of the picture and the gif to 540px, only because with something like snow I know I’m not going to need to do a lot of adjusting. You can see that it doesn’t cover all of the image, so I just pasted the snow gif again and positioned it below the first one.
18. Set Frame Delay.

Make sure you have all frames selected, then click on the little arrow on one of the frames. Select “Other” and enter your desired frame delay. I usually go with something like 0,07 seconds.
At this point I also added a layer mask to the overlay gif and used a soft brush with a low flow to make the effect a little less visible on his face. I also sharpened the image and added a bit of coloring.
Save your gif and you should have something like this:

19. High five yourself, because you just made a freaking overlay gif.
#tutorial#overlay gif#@ the person who requested this: I'm sorry this took so long#I hope it's helpful at least
259 notes
·
View notes
Text
Gif brewery 3 frame speed

#Gif brewery 3 frame speed install#
#Gif brewery 3 frame speed mac#
And finally, you can also add extra padding around the sprite sheet. If you increase the percentage, more shades and tones will be matched and if you decrease the percentage, then only the given color or just a few tones will be replaced. Also, with the color tone threshold option, you can control how many similar shades of the given color will be replaced. If the given GIF is transparent and has no background, then simply enter "transparent" in the GIF background color. For example, if the background color of a GIF is red and you want to change it to blue, then you need to enter "red" in the GIF background color field and "blue" in the new sprite background field. You can also change the background color of sprites or add a new background if there is none. When playing a GIF, frames are counted above the input box and you can easily delete frames that you don't need by entering their numbers in the skip frames option. The playback order of GIF frames can be either forward (from the first frame to the last) or backward (from the last frame to the first). By default, it's 250 milliseconds for each frame, which equals 4 frames per second. The app has the file-size limit of 30 MB. You can capture up to 400 photos and videos to create GIFs. GIF animation resizing is sometimes tricky, and you. Useful when you need to reduce GIF size or fit the image in specific dimensions.
#Gif brewery 3 frame speed install#
You can even split and merge multiple GIFs in one frame. Ezgif's online image resizer will resize, crop, or flip animated gifs and other images, with the same quality and speed as professional software, without the need to buy and install anything. It allows you to go with basic edits like crop, resize, optimize and more.
#Gif brewery 3 frame speed mac#
GIF's framerate is determined by how long a single frame is displayed before moving to the next frame. Unlike above listed Mac apps, Ezgif is an online GIF converter. When you open a GIF, you can use the GIF animator options to enable or disable its playback, control the frame rate, and reverse the order of sprites in it. If only the columns number is specified, for example, 3, then the program will distribute all frames into three equal vertical columns. For example, if you enter only the rows value equal to 2 and leave the columns value empty, the program will fit all frames in 2 equal horizontal lines. You can also specify only one of the dimension parameters. For example, by specifying the number of rows equal to 2 and the number of columns equal to 5, you will get a sprite rectangle with a width of five frames and a height of two frames. By default, the frames are drawn in a horizontal animation strip as it's the most popular type but you can change the dimensions and the layout of the sprite sheet to any of the three possible types by adjusting the rows and columns options. The vertical and horizontal sprite sheets are called sprite strips but the rectangular sprite sheet is called a sprite grid. There are three types of sprite sheets – vertical, horizontal, and rectangular. It extracts all frames from the loaded GIF animation and lays them out in an image sequence called a sprite sheet. The GIF will be created from the video in between the start and end points as represented by the green and red bars on the video scrubber.This is a browser-based GIF to sprite sheet converter. Once selected, GIF Brewery 3 will open the video. You will want to select the video file you wish to use to get started. This will bring up an “Open File…” dialog window. To actually get started with your video, you’ll want to choose the “Video…” option in the top right of the Welcome Screen. It gives a quick explanation of all the standard features and. More importantly for intrepid GIF Brewers, you’ll want to view the “Basics” tab. It offers information on the latest version, updates, and contact details for support. Upon opening GIF Brewery 3, you’ll be presented with the Welcome Screen. However, in this tutorial, we’ll be focusing on just quickly creating a simple. In addition, GIF Brewery can help you quickly create GIFs from iOS or Mac screen recordings. GIF Brewery helps you create *.gif files or Gfycats from clips of your video files.
0 notes
Text
Version 461
youtube
windows
zip
exe
macOS
app
linux
tar.gz
I had a great week doing a lot of background cleanup work, and I also fixed some things and improved some quality of life.
highlights
I brushed up last week's .clip file metadata parsing. Some clip files were getting too-small resolutions and thumbnails due to a 'canvas unit' issue, basically some clips store resolution in mm or inches etc... rather than pixels. Thanks to a user who also provided some great examples, we managed to pin down a solution to get actual pixel resolution, and I also figured out duration and number of frames for animated clips. All clips will reparse again on update and generate nicer size thumbs if they need it.
Also, if you ever got a webm that seemed normal except it somehow had a crazy 7 hour duration, I think I figured out the problem here too. All superlong-but-actually-small files will be reparsed on update and should get a more accurate duration.
When you right-click on tags in the taglist, the 'search' submenu now provides actions to require/exclude 'namespace:anything' if your selection all shares the same namespace.
Also, as a little test, I am trying out a new quiet shortcut on the file selection taglist. If you now hold down control when double-clicking or hitting enter on tag(s) here, they now go up to the search negated. Double-click = 'add tag to search', ctrl+double-click = 'add -tag to search'. Of course ctrl+click is awkward since it can cause a deselection, so I think this could do with some more work, and eventual integration into the shortcuts system so you can change it as you like, but let me know what you think. A user recommended adding the +/- buttons as you see on some boorus, so this is my interim step towards that.
When you paste query texts into the edit subscription dialog, if any of the texts you paste are already in the subscription and currently DEAD, the dialog now revives those subs (basically the same as 'check now'). I have personally wanted this for ages and kept forgetting to add it. The sub will just do another quick check on what you paste, just in case that query started getting things again recently, rather than swallowing your input as forevermore DEAD.
I moved some autocomplete options from 'gui pages' options panel to 'search'. If you are a Linux user who has trouble with the floating autocomplete dropdown window, check it out and see if 'embedding' the dropdown works better for you.
full list
misc:
the text on the animation scanbar is now center-vertically aligned and should look better on taller and thinner scanbars (issue #998)
the scanbar now reports better frame number and current time for the mpv player when the current video is very short or has very few frames. screamer gifs should now report 2/2 frames if you scan to the right, not like 97/2
fixed using the mpv player with an embed button (it previously was staying hidden even after embed was clicked) (issue #999)
the 'search' submenu when you right-click on tags in certain locations now shows add/exclude namespace:anything if all the selected tags share the same namespace
as an experiment that I think will be bulked out into proper shortcuts later, and maybe actual +/- buttons like you'll see on a booru, if you activate the 'selection tags' listbox (double-click or enter key) while ctrl is down, it now excludes the selected tags from the current query
when you paste query texts into the edit subscription dialog, those queries already in the sub _and_ DEAD will now be revived (it does a 'check now' on them). the dialog reports this
when editing subscriptions, the way it waits for the current subs to stop running is improved. it is now separate from the global 'pause subs' variable, so big delays here (e.g. waiting a long time to open the dialog, then hitting 'pause' on the network menu, which was secretly a logically messy unpause) should be less able to run into trouble
watchers now sort DEAD and 404 separately when sorting the status column (previously they were sorted by their now-defunct 'next check time')
I think I improved the speed of the new subscriptions guaranteed shutdown. I think I also fixed a shutdown hang on some lagging async jobs. there are a couple of reports of hanging shutdown, so let me know if this changes
I moved the autocomplete options from 'gui pages' to 'search', and I brushed up the layout and tooltips there generally
.
file parsing:
clip files with canvas size units in mm, cm, inches, or points are now parsed correctly! thanks to the user who helped here! turns out a point is 1/72 (two grossths :^)) of an inch
clip animations now get the number of frames and duration of the first timeline!
all clip files will reparse for fixed resolution and duration and make new thumbs as needed on update
hydrus file parsing should now detect the duration of video and audio with 10 or more hours duration
hydrus now gets a more accurate duration estimate for files with bonkers duration/start_offset pairs, for instance "Duration: 127:57:31.25, start: 460633.291000". if you ever saw a 7MB webm with 5 hour duration (and actually 18 seconds), it could have been this. hydrus now counts frames manually when you get this sort of thing
any file with resolution > 360p, a duration over an hour, and size less than 64MB will be scheduled for a file metadata reparse on update
.
client api:
/get_files/file_metadata now has an optional boolean parameter, 'hide_service_names_tags', default False, which will hide the old 'service_names_to...' tag Objects
a unit test tests hide_service_names_tags
client api help documentation now talks about hide_service_names_tags
client api version is now 22
.
boring code refactoring and cleanup:
tl;dr: about 60KB total code moved out of client database!
moved most combined sibling+parent database code to a new 'tag display' module
moved autocomplete counts cache database code to a new 'mappings counts' module, and refactored a whole lot of of misc old a/c table creation and reference code into that module, cleaning things up
the 'mappings counts' module is plugged into new repair code and on error repopulates itself as efficiently as regen code currently allows
moved tag cache code to a new 'tag search' module, and similar related decoupling refactoring
the 'tag search' module is plugged into new repair code and on error repopulates itself very efficiently
the 'local tags cache' module can now regenerate itself on boot
regenerating the local tags cache now works a little faster and takes less memory
I _believe_ client.caches.db can now regenerate all of itself automatically, with no subsequent user actions needed
the boot database repair notifications have some quality of life improvements. modules now say whether they think they can recover everything, and there is more guidance on what to do in the different situations
during various heavy database work, a common analysis tool now saves a lot of time on regeneration vs generation
pubsubs now go through the transaction wrapper, meaning modules can pubsub
emergency boot messages (like database trouble) are now printed to the log
next week
More small work and bug fixes, and I really want to get my teeth back into multiple local file services.
0 notes
Text
Best Treatment For Wrinkles On Face 2021

You remain before the mirror and unexpectedly find your first wrinkle.
You realized this day would come one day, yet not that it would be unexpectedly early, presently what?
Wrinkles are delightful and give a face character. Just on our own face, we don’t really want to see them.
As a matter of first importance, recollect that nobody can 100% forestall skin maturing.
Recall that eventually it’s tied in with being glad, regardless of the number of wrinkles you have.
Use UV assurance consistently, even in winter!
Stop smoking!
Use a stripping!
Retinol – the demonstrated compelling fixing
Drink Collagen consistently!
Microneedling!
Use items with Hyaluronic Acid
Watch your eating routine -sugar is the villain
Less pressure
Reduce the measure of water on your skin.
Yet, in the event that you actually get the opportunity to handle them and make your skin sparkle much more, at that point these tips will help you on your way.Furthermore, let’s face it, who wouldn’t need that?
1: Use UV assurance consistently, even in winter!
This tip is legitimately number 1! Not utilizing a SPF can measure up to going to a dietician with the longing to get in shape, yet need to eat chips at home.
Doesn’t actually bode well, isn’t that right?
The equivalent goes for your skin.
On the off chance that you need to decrease future wrinkles, utilizing a cream with SPF is a MUST.
Throughout the entire year, remembering for winter!
About 90% of our skin maturing is brought about by UV beams. Likewise because of UVA beams that are available throughout the entire year.
The “A” in UVA causes “Maturing” and furthermore basically goes through glass.
It doesn’t imply that somebody who is in every case great at greasing up won’t get wrinkles, however it can happen a ton. click herefor an outline of the entire day cream’s items with a spf of dermalogica.
It is a little exertion! Not persuaded at this point? Discover here how UV beams can deal with your skin!
2: Stop smoking!
Number two guilty party for the presence of wrinkles.
By smoking, and furthermore smoking, the skin can age ten to twenty years sooner.
Why? Cigarette smoking advances the breakdown of collagen and elastin in the skin.
Furthermore, nicotine limits veins and diminishes blood stream to the skin.
That implies less oxygen and fundamental supplements for the skin cells.
The outcome: a dark skin tone, more wrinkles and less flexible. The arrangement sounds straightforward; quit smoking.
It appears to be a basic counsel, yet have confidence we additionally understand that it is a fixation.
This doesn’t imply that this ought not be absent from our rundown. Our past model about visiting a dietician additionally applies here.
3: Use a stripping!

Would you like to improve your skin rapidly and successfully?
At that point the utilization of a stripping is an absolute necessity!
Why? From the age of thirty, the cell restoration of our skin eases back down.
Cells discharge less effectively, with the goal that less new skin cells are shaped.
Result; your skin becomes grayer and more blunt, making you look “more seasoned” quicker.
A stripping guarantees that these old cells discharge all the more rapidly and would thus be able to clear a path for solid, new cells.
This makes your skin look fresher and better.
There are various kinds of acids. It is along these lines essential to know ahead of time which corrosive is best for your skin.
Not utilizing a strip appropriately can be counterproductive. Something you don’t need obviously.
Snap here for more data about various acids andhere for an outline of all dermalogica strips that you can use at home.
Do you have any further inquiries?
4: Retinol – the demonstrated compelling fixing
Is it true that you are around 30?
At that point this is the fixing that ought not be absent in your everyday practice.
Retinol is gotten from Vitamin A corrosive, the solitary fixing experimentally demonstrated to restore the skin.
Nutrient A corrosive (otherwise called tretinoin) animates cell division and the creation of collagen and elastin.
Furthermore, that is by and large what your skin needs when you get more seasoned.
Note, there is a huge contrast among retinol and Vitamin A corrosive.
Nutrient A corrosive is a lot more grounded and more successful, yet just accessible on medicine from your primary care physician or dermatologist.
Would you particularly like to decrease the presence of barely recognizable differences or defer the presence of wrinkles? At that point you can begin with an item with retinol.
Dermalogica has a few items with retinol for home use, such as;
Overnight retinol fix and age inversion eye fix.
Is it accurate to say that you are searching for a serious lift for your skin?
At that point book our “Sparkle Peel”! Toward the finish of these medicines we apply no under 4% retinol!
5: Drink Collagen consistently!

Your body comprises of up to 30% collagen and as a protein it is generally normal in the connective tissue of your skin, organs and joints.
Collagen gives more strength and design in your body.
Each individual advantages from adequate collagen consumption. Collagen is created in the skin, in addition to other things.
Yet, that cycle progressively lessens with age. What’s more, that is tragically quicker than you might suspect
. From your late twenties, mid thirties, your skin begins to lose about 1% collagen each year.
The skin of the old is hence additionally more vulnerable and more slender than that of more youthful individuals.
Outside factors likewise impact the creation and breakdown of collagen filaments in the skin. Sun openness, for instance, smoking, yet in addition certain food varieties.
Did you realize that collagen can’t be consumed by the skin? Would you truly like to battle your wrinkles, at that point you should take collagen easily.
This is the solitary route for collagen to be ingested into your body.
6: Microneedling!
As the name proposes, exceptionally little openings are made in the skin during this treatment.
This makes little vertical channels, which are not obvious to the eye. Thusly, the skin is animated to deliver collagen and elastin.
The consequence of the treatment?
Your skin looks smoother, fresher, better and more brilliant!
For the best outcome, it is additionally prudent to go through a few medicines, at time frames weeks.
Did you realize that you can likewise join this treatment with a stripping?
Take out two targets with one shot! Peruse more information? click here
7: Use items with Hyaluronic Acid
To fill in wrinkles, fillers with hyaluronic corrosive, a substance created by the body that are infused into the skin, are frequently utilized.
This substance draws in dampness, making the cells swell and fill the skin.
Try not to stress, you don’t need to manage needles yourself, since this substance can likewise be applied to the skin by means of a serum or cream.
And, after its all said and done, hyaluronic corrosive draws in dampness, so it goes about as a transitory ‘filler’ and extensively relax wrinkles.
Examination has likewise shown that in the more drawn out term wrinkles show up optically less, yet the phone structure really changes, so that wrinkles step by step decrease.
Dermalogica’s answers with hyaluronic corrosive; Skin hydrating sponsor , Skin hydrating masque , Calm water gel.
8: Watch your eating routine – sugar is the villain
It should not shock anyone that your eating routine influences your skin. Evade sugars:
Besides being better for your weight to keep sugars standing, sugars are additionally wrinkle-formers.
They tie to your collagen and elastin tissues, making your skin lose its gracefulness and wrinkles.
What’s more, albeit a glass of wine contains cell reinforcements, over the top liquor utilization can really speed up skin maturing, since liquor likewise contains sugar.
Individuals who totally quit eating (added) sugars notice following half a month that their skin has totally changed and wrinkles have diminished extensively.
How extraordinary is that? It is obviously difficult to lessen sugar consumption, yet now you understand what you are doing it for.
9: Less pressure
It has been experimentally demonstrated that pressure can speed up skin maturing.
Persistent pressure makes all the more free revolutionaries and a sped up breakdown of our hereditary material.
Accordingly, the cell quits isolating prior and we age. We’ve all had our skin feel drier when we have a cold or look redder when we rest less well.
What numerous individuals don’t know is that the body can’t recognize positive or negative pressure.
Terrible rest, being debilitated or getting hitched are completely capable by the body as pressure.
10: Reduce the measure of water on your skin.
Water can harm the characteristic defensive layer of your skin.
The skin loses dampness all the more rapidly and dries out, bringing about wrinkles. Do you cherish a hot shower?
Your skin ponders that. High temp water dries out the skin considerably more.
That is the reason your skin will likewise pull in the wake of showering.
The ideal temperature for a shower or shower is around 37 ° C.
Tip: don’t utilize a forceful chemical with liquor, it will dry out the skin seriously!
Utilize a cleaning agent uncommonly intended for your skin!
Not certain which one suits your skin best? Snap here for an outline of all dermalogica chemicals.
Last idea
Even more motivation to drop by sometimes for a loosening up treatment!
Did you realize that you likewise get a back rub while going through a treatment?
0 notes